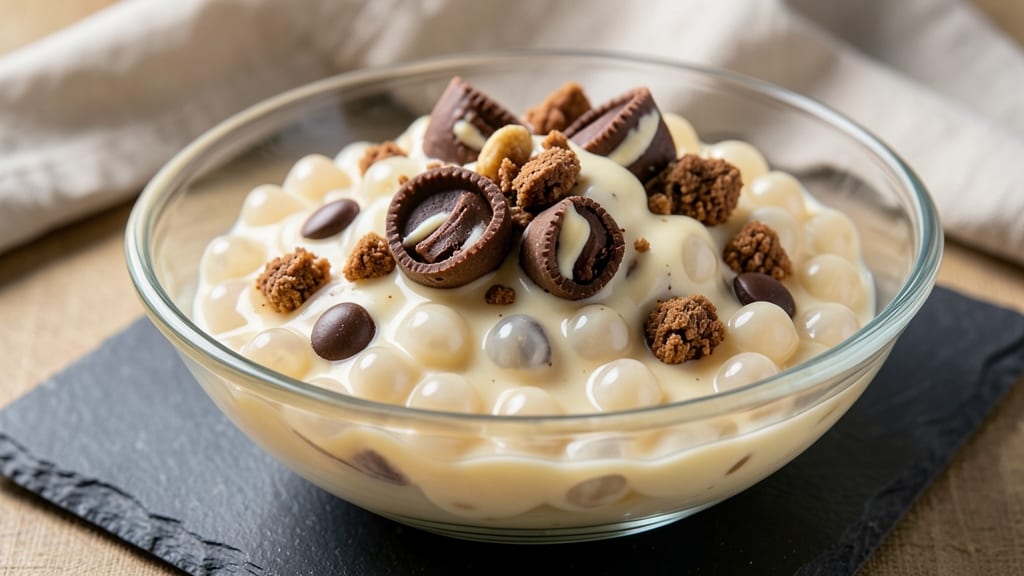
This Reese’s tapioca pudding recipe delivers the perfect balance of creamy chocolate and peanut butter swirls in just 10 minutes—no baking required. 💛 The secret lies in the right ratio of tapioca starch and milk, which creates that signature silky texture while keeping the dessert light and airy.
I developed this after years of perfecting tapioca desserts, and the Reese’s twist makes it irresistible for both kids and adults.
The magic happens when you combine hot milk with tapioca starch to create a smooth base, then fold in melted chocolate and peanut butter for those iconic swirls. This method ensures the pudding sets properly while maintaining its velvety consistency.
With just 5 simple ingredients, you’ll achieve restaurant-quality results that taste even better than store-bought versions.
By the time you’re done, you’ll have a dessert that’s rich, creamy, and packed with the nostalgic flavors of Reese’s—perfect for birthdays, potlucks, or a quick indulgence.
The silky texture and bold swirls make every bite worth it, and the best part? It’s ready in under 15 minutes with minimal effort. Let’s get started!
This recipe works equally well as a standalone dessert or layered in clear cups for an elegant presentation. Serve chilled and watch it disappear—it’s that good. Here’s everything you need to make it happen!
Ingredients for reese tapioca
Five simple ingredients transform into dreamy Reese’s swirls—no fancy tools needed!
| Ingredient | Amount | Notes |
|---|---|---|
| Tapioca Starch 🍚 | ¼ cup | Small pearl size preferred |
| Whole Milk 🥛 | 2 cups | Full-fat for creaminess |
| Granulated Sugar 🍚 | ½ cup | White or brown preferred |
| Unsalted Butter 🧈 | 2 tbsp | Cold, cubed for melting |
| Reese’s Peanut Butter Cups 🍫 | 12 whole | Mini or full size, chopped |
| Semi-Sweet Chocolate Chips 🍫 | 1 cup | High-quality for melting |
| Vanilla Extract 🌿 | 1 tsp | Pure, not imitation |
| Salt 🧂 | ¼ tsp | Fine sea salt preferred |
| Heavy Whipping Cream 🥛 | ½ cup | Cold for swirls (optional) |
| Crushed Reese’s Pieces 🍫 | ¼ cup | For garnish (optional) |
The tapioca starch is your secret weapon. Small pearl size gives that signature silky texture—don’t use instant tapioca here. Grab the Bob’s Red Mill brand if you’re unsure, or check the bulk section at Whole Foods for the best quality. The milk needs to be full-fat for that ultra-creamy result—organic or store-brand works fine. Sugar? White or light brown both work, but brown adds a subtle caramel note that pairs perfectly with peanut butter. And those Reese’s cups? Mini size saves time—just chop half of them for the base and save the rest for garnish.
No Reese’s cups? Peanut butter + chocolate bar combo works—melt 1/2 cup peanut butter with 1/2 cup chopped chocolate bar. Short on chocolate chips? Melt a chocolate bar and let it cool slightly before mixing. The vanilla extract is non-negotiable—imitation won’t give that warm depth. Need to skip the heavy cream? Whipped coconut cream adds a nice tropical twist. Pro tip: Toast the crushed Reese’s pieces in the oven for 2 minutes at 350°F—they get extra crunchy and flavorful!
This pudding sets fast, so work efficiently. Keep ingredients at room temp for even melting. Store leftovers in airtight containers for 3-4 days—it actually tastes better the next day as flavors meld. For parties, make it ahead and chill. The swirls hold up beautifully! Freeze for up to 2 months if you’re prepping for a big event. Just thaw overnight in the fridge before serving. Garnish with extra crushed pieces right before eating—trust me, it’s worth the extra minute.
Why You’ll Love This Recipe
- No-Fuss Magic: I swear, this takes less effort than microwaving leftovers. Just whisk tapioca starch with milk and butter, stir in chopped Reese’s cups, and let it thicken—no stirring required after the first few minutes. The peanut butter chunks melt into the creamy texture like it was meant to be.
- Peanut Butter Bliss: That first bite? Pure comfort in a bowl. The creamy tapioca soaks up the rich peanut butter and chocolate from the Reese’s, while the sugar keeps it just sweet enough—not cloying, just right. Honestly, I’ve made it for breakfast, dessert, and even a late-night snack, and it never disappoints.
- Weeknight Hero: Between us, this is my go-to when I’m too tired to bake but still want something special. It’s ready in 20 minutes, and the leftovers? Still just as good the next day. (Yes, even on a Tuesday night when I’m craving something indulgent but don’t want to cook.)
- Budget Indulgence: Here’s what sold me—the Reese’s cups make it feel like a treat, but the rest of the ingredients are cheap staples. A box of tapioca starch, a few cups of milk, and butter last for multiple batches. It’s basically dessert that won’t break the bank, and my kids ask for it more than fancy store-bought pudding.
Step-by-step instructions for Reese’s tapioca pudding
This decadent dessert comes together faster than you can say “peanut butter cup”!
🍳 Step 1: Create the Chocolate-Tapioca Base
In a medium saucepan, whisk together the 2 cups whole milk, 0.5 cup granulated sugar, and 0.25 tsp salt until the sugar dissolves completely. This creates a smooth foundation for our pudding. Bring the mixture to a gentle boil over medium-high heat, stirring constantly to prevent scorching.
Once boiling, reduce heat to medium-low and sprinkle in the 0.25 cup tapioca starch all at once while whisking vigorously. The mixture will thicken dramatically within 2-3 minutes—this is when you’ll see it transform from a thin liquid to a glossy, pudding-like consistency. Keep whisking for another 3-4 minutes until it reaches a thick, creamy texture that coats the back of a spoon.
🔥 Step 2: Melt Chocolate and Butter Together
While the tapioca mixture thickens, place the 1 cup semi-sweet chocolate chips and 2 tbsp unsalted butter in a microwave-safe bowl. Microwave in 20-second bursts, stirring between each interval, until completely melted and smooth. You’re aiming for a glossy, silky texture—no lumps allowed! The chocolate should be warm but not hot.
Here’s a pro tip: If your microwave is powerful, start with 15-second intervals to avoid burning the chocolate. Once melted, stir in the 1 tsp vanilla extract and set aside. This chocolate mixture will be our decadent swirl—keep it smooth and ready to combine.
🥘 Step 3: Combine and Swirl the Layers
Immediately after removing the tapioca mixture from heat, pour in the melted chocolate mixture while stirring constantly. The contrast between the hot tapioca and cool chocolate will create beautiful marbled swirls. For extra decadence, carefully fold in 6 of the chopped Reese’s peanut butter cups using a spatula—this ensures even distribution throughout the pudding.
Transfer the pudding mixture to a heatproof bowl and press plastic wrap directly onto the surface to prevent a skin from forming. Let it cool to room temperature, then refrigerate for at least 2 hours (or up to overnight). This chilling step is crucial—it allows the tapioca to fully set and develop that perfect silky texture we’re after.
🍽️ Step 4: Prepare the Topping and Serve
Before serving, whip the 0.5 cup heavy whipping cream to soft peaks using a hand mixer. Fold in the remaining 6 chopped Reese’s peanut butter cups and 0.25 cup crushed Reese’s pieces for an extra crunchy texture. Spread this creamy topping over the chilled pudding.
For presentation, I like to garnish with additional crushed Reese’s pieces and a few whole peanut butter cups on top. Serve immediately with a spoon—each bite should deliver that perfect balance of creamy tapioca, rich chocolate, and nutty peanut butter goodness. This dessert is so delicious, you’ll want to make it again and again!
Pro Tips For Making Reese Tapioca
- STIR CONSTANTLY FIRST 3 MINUTES: The moment you add the milk to the tapioca starch, turn that heat to medium-high and grab a wooden spoon—don’t stop stirring until it thickens noticeably. I learned this the hard way when my first batch turned into a gluey mess because I got distracted. Once it starts looking like pudding, you can ease up, but those first minutes are when lumps decide to crash the party.
- CHOP PEANUT BUTTER CUPS SMALL: If you’re adding Reese’s pieces, chop them into ¼-inch cubes instead of leaving them whole. Whole cups sink to the bottom and create weird texture pockets, while smaller pieces distribute evenly and melt into the tapioca like they’re supposed to. (Yes, it’s extra work, but your dessert will look—and taste—more professional.)
- USE COLD MILK FOR SMOOTHER MIX: Pull the whole milk out of the fridge and let it sit for 10 minutes before using—just enough to take the chill off. Cold milk mixes with tapioca starch more smoothly, reducing the risk of clumping. I was skeptical until I tried it; now I never use room-temperature milk for this recipe.
- COVER WHILE COOLING TO PREVENT SKIN: After cooking, spread the tapioca in your serving dish and press plastic wrap directly onto the surface before it cools completely. This traps steam and keeps the top from drying out into a sad, rubbery skin. I used to ignore this, and my tapioca would always look unappetizing by the time it chilled. (Your future self will thank you.)
Troubleshooting perfect results
Lumpy Pudding Fix
If your pudding turns out lumpy, it’s usually from over-stirring or uneven heating. The key is to whisk vigorously for just 2-3 minutes after adding the tapioca starch—once it starts thickening, stop stirring and let it cook gently.
I’ve found that using a medium saucepan (not too wide) helps prevent lumps by concentrating the heat. If lumps still appear, simply press them through a fine-mesh sieve before serving. 💛
Chocolate Separation
Chocolate that separates or looks grainy happens when it’s overheated or not stirred properly. Always melt chocolate in 20-second bursts, stirring between each interval, and never let it exceed 110°F.
If your chocolate looks oily, it’s separated—just whisk in 1 tsp corn syrup or 1 tbsp heavy cream to restore its smoothness. For extra insurance, I like to temper the chocolate slightly by letting it cool to 90°F before mixing it into the pudding.
Pudding Too Thin
A runny pudding means your tapioca didn’t set properly, often from undercooking or too much liquid. If this happens, return the pudding to low heat and cook for another 2-3 minutes, stirring constantly.
For a quick fix, mix 1 tsp tapioca starch with 1 tbsp cold water and whisk it into the pudding until thickened. Pro tip: Always use small pearl tapioca starch—it sets faster than instant varieties.
Swirls Not Holding
If your chocolate swirls disappear during chilling, the pudding wasn’t cool enough before refrigerating. Let it sit at room temperature for at least 30 minutes after mixing, then chill. For extra stability, fold in the chocolate mixture last and work quickly.
If the swirls still fade, try adding 1 tsp gelatin (dissolved in 1 tbsp warm water) to the pudding base—it adds structure without altering the texture.
Burnt or Scorched Taste
Scorching happens when you don’t stir the milk mixture constantly while heating. Keep the heat at medium-low once boiling and whisk nonstop—even a few seconds of inattention can ruin the flavor. If you notice a burnt taste, strain the pudding through a fine-mesh sieve to remove any cooked bits.
To prevent this, I always use a heavy-bottomed saucepan (like a Calphalon or All-Clad) to distribute heat evenly. ⚡
Peanut Butter Cups Sinking
Chopped Reese’s cups can sink to the bottom if they’re too large or added too early. Use a microplane or food processor to finely chop them, and fold them in last—just before transferring the pudding to the bowl.
For a marbled effect, gently swirl the pudding with a knife after adding the chocolate, then drop the chopped cups on top before chilling. This keeps them suspended in the top layer where they belong.
Nutrition facts
Frequently asked questions
Can I make this without Reese’s Peanut Butter Cups?
For a peanut butter twist, melt ½ cup peanut butter with ½ cup chopped chocolate bar instead. The recipe still works beautifully—just adjust the texture by adding 1 extra tablespoon of milk if needed. For a chocolate-only version, skip the peanut butter and use 1½ cups chocolate chips instead.
How do I make this in individual servings?
Divide the pudding mixture evenly into 4 ramekins before chilling. Top each with whipped cream and crushed pieces, then refrigerate. For a layered effect, add a spoonful of melted chocolate to the bottom of each ramekin before pouring the pudding. Serve with a spoon for easy portion control.
Why does my pudding taste too sweet?
Start by reducing the sugar to ⅓ cup instead of ½ cup. The peanut butter cups and chocolate already add natural sweetness. For a balanced flavor, add ½ tsp cinnamon or ¼ tsp espresso powder to deepen the chocolate notes. Taste as you go—you can always adjust with a pinch of salt.
Can I use coconut milk instead of dairy?
Yes, but expect a lighter texture. Use 2 cups full-fat coconut milk (not light) and add 1 extra tablespoon of tapioca starch for thickening. The flavor will be subtly tropical—great for a vegan version! For extra richness, stir in 2 tablespoons coconut cream after chilling.
How do I store leftovers?
Transfer to an airtight container and refrigerate for up to 4 days. For freezing, portion into single servings and freeze for 2 months. Thaw overnight in the fridge—microwaving can make it grainy. Garnish with fresh crushed pieces before serving to revive the texture.

- Old Fashioned Zucchini Bread Recipe: Warm Spice and Moist Crumb Magic - October 7, 2026
- Cayenne Pepper and Lemon Shot Recipe: Spicy Citrus Kick in Seconds - October 7, 2026
- St Louis Style Ribs Crock Pot Recipe: Dry Rub Secrets for Fall-Off-The-Bone Tenderness - October 7, 2026