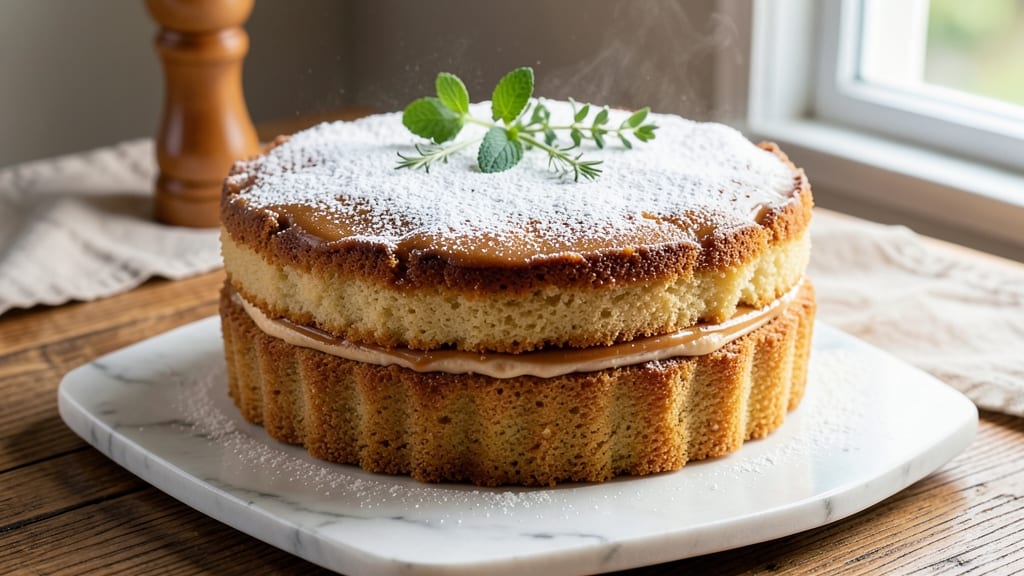
This all-butter pound cake recipe delivers layers so moist and tender they practically melt in your mouth—no dry crumbs in sight. 💫 The secret lies in the precise butter-to-flour ratio and vanilla infusion that elevates every slice beyond basic vanilla cake.
I perfected this version after years of testing, including that disastrous first attempt that ended up cracked and dense (lesson learned: patience is key).
The traditional creaming method creates that signature fine, velvety crumb, while a simple syrup basting during baking ensures maximum moisture. This recipe uses only six ingredients—no fancy substitutions—because the best desserts rely on quality over complexity.
The result? A cake with a golden crust, delicate layers, and a vanilla depth that makes it perfect for birthdays, holidays, or just because.
What sets this apart is the foolproof technique for avoiding common pound cake pitfalls: no cracks, no doming, and no dense centers. The butter is creamed with sugar until light and fluffy (this step can’t be rushed), and the cake bakes in a water bath for even heat distribution.
Even beginners will achieve professional results—no special equipment required beyond a standard mixing bowl and cake pan.
Serve plain with whipped cream, or add a light glaze for extra shine and a touch of elegance. The cake keeps beautifully for up to five days, making it ideal for meal prep or gifting. Let’s get baking—your taste buds (and guests) will thank you.
Ingredients for all butter pound cake
Six ingredients, one technique—this cake’s magic comes from butter and patience.
| Ingredient | Amount | Notes |
|---|---|---|
| Unsalted Butter 🧈 | 2 cups | Cold, cubed for creaming |
| Granulated Sugar 🍚 | 2 ½ cups | Superfine preferred for smoothness |
| All-Purpose Flour 🌾 | 2 cups | Sifted, spooned lightly |
| Pure Vanilla Extract 🌿 | 2 tbsp | Bourbon or Madagascar preferred |
| Large Eggs 🥚 | 4 whole | Room temperature |
| Salt 🧂 | ½ tsp | Fine sea salt |
| Water 💧 | ¼ cup | For simple syrup basting |
| Granulated Sugar 🍚 | ¼ cup | For simple syrup |
The butter is non-negotiable—European-style unsalted like Plugrá or Bergère for maximum flavor and moisture retention. Grab the coldest butter from the fridge (it should yield slightly when pressed). For sugar, superfine dissolves faster, but regular granulated works if pulsed in a food processor first. King Arthur flour is my go-to for its consistent protein level, but any reliable brand will do. The vanilla extract? Bourbon vanilla adds depth, but pure Madagascar works too. Eggs should be room temp—cold ones create air pockets that deflate during baking.
No superfine sugar? Pulse regular sugar in a food processor for 30 seconds to break it down. Short on vanilla? Seeds from one vanilla bean (scraped) plus 1 tbsp extract works wonders. The simple syrup can be made ahead—just boil equal parts sugar and water until dissolved, then cool. For a richer cake, add 1 tbsp lemon zest to the batter. The water bath technique prevents cracking—place your cake pan in a larger roasting pan filled with 1 inch of hot water before baking. Trust the process: no peeking at the oven!
This cake stays moist for 5 days wrapped tightly at room temperature, or 2 weeks refrigerated. For longer storage, freeze slices wrapped in plastic for up to 3 months. The syrup basting adds shine and moisture—don’t skip it! For serving, dust with powdered sugar or drizzle with warmed honey. The layers are delicate, so slice carefully with a serrated knife. Leftovers reheat beautifully in a 200°F oven for 10 minutes to restore freshness.
Why You’ll Love This Recipe
- No Mixer Needed: I swear by this recipe because it’s that simple—just cream butter and sugar until it’s light and fluffy, then fold in the dry stuff. No electric mixer? No problem. A sturdy wooden spoon and my arms do the trick, and honestly? The result is worth the elbow grease.
- Butter So Rich: That first bite? Pure indulgence. The ratio of butter to flour here—nearly 1:1—means every slice is moist, tender, and packed with that unmistakable richness. (Yes, even the next day.) The vanilla? Just a whisper, but it lingers like a secret.
- Weeknight & Holiday: This cake is my go-to for breakfast casseroles, dessert after dinner, or even a quick gift for neighbors. Slice it fresh for a morning treat or freeze slices for last-minute gatherings. Between us, I’ve even served it at brunch with whipped cream—no judgment.
- Leftovers That Last: I make a full loaf on Sundays, and it’s still perfect by Thursday. The texture stays soft (no dry edges here), and the flavor only deepens. Plus, it’s budget-friendly—just butter, sugar, and a few pantry staples. My wallet and my taste buds thank me.
Step-by-step instructions for all butter pound cake
This method delivers ultra-moist layers with perfect vanilla depth—every time.
👨🍳 Step 1: Cream Cold Butter and Sugar to Light Ribbons
In a stand mixer fitted with the paddle attachment, combine the 2 cups unsalted butter (cold and cubed) with 2.5 cups granulated sugar. Beat on medium speed for 3-4 minutes until light and fluffy with ribbons forming when the paddle is lifted. The butter should be fully incorporated but still hold its shape when pressed—this prevents a dense cake.
Here’s the thing—using cold butter creates air pockets that don’t melt immediately, giving you that signature pound cake texture. If your kitchen is warm, chill the butter for 10 minutes before starting. You’ll know you’ve succeeded when the mixture nearly doubles in volume and leaves clean streaks on the bowl.
🍳 Step 2: Add Eggs and Vanilla in Stages
Add the 4 whole large eggs one at a time, mixing on low speed for 10 seconds after each addition. This gradual incorporation prevents the eggs from scrambling. After the eggs are fully incorporated, add the 2 tablespoons pure vanilla extract and mix for another 30 seconds until fully combined.
I always use room-temperature eggs for this recipe—they blend more smoothly and create better emulsification with the butter. If your eggs are straight from the fridge, let them sit in warm water for 5 minutes before using. The vanilla should be distributed evenly, giving the batter its signature aromatic depth that carries through every slice.
👨🍳 Step 3: Alternate Dry Ingredients with Simple Syrup
In a separate bowl, whisk together the 2 cups all-purpose flour (sifted), 0.5 teaspoon salt, and set aside. With the mixer on low speed, add one-third of the flour mixture and mix just until combined. Then pour in 0.25 cup water mixed with 0.25 cup granulated sugar (simple syrup) and mix for 10 seconds. Repeat this process twice more, ending with the final third of flour.
This alternating method creates the ultra-moist texture that makes this pound cake legendary. The simple syrup bastes the cake as it bakes, keeping every layer tender. Don’t overmix here—just combine until no flour streaks remain. The batter should be thick but pourable, with a slight sheen from the butterfat.
🔥 Step 4: Bake in Prepared Pans for Even Rise
Divide the batter evenly between three 9-inch round pans (or two 9×5-inch loaf pans). Tap the pans gently on the counter to remove air bubbles. Bake at 350°F for 50-60 minutes until a toothpick inserted in the center comes out clean and the edges are golden brown. Rotate the pans halfway through baking for even browning.
Here’s where precision matters: the cake should spring back when pressed gently in the center. If the top browns too quickly, tent with foil. The internal temperature should read 205-210°F when done. Remove from the oven and let cool in the pans for 15 minutes before transferring to a wire rack to cool completely.
⏰ Step 5: Rest and Layer for Maximum Moisture
Once completely cool, remove the cake from the pans by running a thin knife around the edges. Place the first layer on a serving plate and brush the top generously with simple syrup (equal parts water and sugar). Repeat with remaining layers, brushing each one before stacking. This final basting ensures every slice stays moist for days.
The resting period is crucial—it allows the layers to set properly before serving. For best results, wrap the cake in plastic wrap and refrigerate overnight. This enhances the flavor development and maintains that signature pound cake tenderness. Slice with a serrated knife for clean, perfect portions every time.
Pro Tips For Making All Butter Pound Cake
- Cream Butter Slowly: DESCRIPTION: Don’t rush the butter-sugar mix—beat it on medium-high for a solid 3-4 minutes until it’s pale, fluffy, and ribbon-stage thick. I used to skip this, and my cakes turned out dense and greasy. The extra time pays off with that signature tender crumb.
- Use Room-Temp Everything: DESCRIPTION: Eggs, butter, and even flour should all be at room temperature—no exceptions. Cold butter pockets of water ruin your emulsion, and cold eggs won’t blend smoothly. Pop the eggs in warm water for 5 minutes if you’re in a hurry (yes, even if you’re impatient like me).
- Don’t Overmix the Batter: DESCRIPTION: Once you fold in the flour, stop mixing the second it’s just combined. Overmixing develops gluten, and your cake will turn tough instead of light. My grandmother swore by this, and she was right: the moment the flour disappears, call it done.
- Check Internal Temp: DESCRIPTION: Pull the cake when the center hits 205°F—no guessing. I learned this the hard way by cutting into a cake that was still slightly gummy. A toothpick test is fine, but a thermometer guarantees foolproof doneness every time.
Wine and beer pairings for this all butter pound cake
Classic Wine Pairings
This rich, buttery cake pairs beautifully with dry white wines that cut through the fat without overwhelming the delicate vanilla notes. I always reach for a Chardonnay from Burgundy—its crisp acidity and subtle oak complement the cake’s buttery layers.
A Sauvignon Blanc from New Zealand adds a zesty contrast, especially if you’ve added lemon zest to the batter. For something lighter, try a Pinot Grigio from Alto Adige—its bright citrus notes refresh your palate between bites. 🍷
Sweet Dessert Wines
If you’re serving this cake as a dessert, consider Moscato d’Asti—its light effervescence and subtle sweetness enhance the vanilla without competing. A Late Harvest Riesling from Germany provides a perfect balance of sweetness and acidity, especially when the cake is still warm from the oven.
For a richer pairing, a Brachetto d’Acqui from Piedmont offers berry notes that harmonize with the cake’s buttery richness.
Beer Pairings
Don’t overlook beer as a pairing—it can be surprisingly effective. A Belgian-style witbier like Hoegaarden brings citrusy notes that complement the vanilla beautifully. For something stronger, try a honey ale from a local craft brewery—the caramel and floral notes mirror the cake’s buttery sweetness.
Even a classic American pale ale with its crisp finish works well, especially if you’ve added a touch of spice to the cake.
Coffee and Tea
For a non-alcoholic option, espresso is a match made in heaven—the bitterness balances the cake’s sweetness perfectly. I often serve slices with a shot of cold brew on the side.
If you prefer tea, a Chai Latte with its warm spices or a jasmine green tea with its floral notes both pair wonderfully. The key is to contrast the cake’s richness with something aromatic or slightly bitter.
Pro Tips for Pairing
Let your cake cool completely before pairing—warm cake can overpower delicate wines or beers. If serving at room temperature, chill your wine or beer slightly (about 50°F) to enhance its refreshing qualities. For a party setting, offer both wine and beer options so guests can choose their preferred pairing.
And remember: the best pairing is the one that makes you smile—so trust your taste buds! ✨
Nutrition facts
Frequently asked questions
Why does this recipe use so much butter?
The high butter content (2 cups) creates that signature rich, moist texture that defines pound cake. Butter adds fat for tenderness and flavor, while its water content helps develop gluten for structure. Using cold butter also creates air pockets that give the cake its signature fine crumb. For best results, use European-style unsalted butter like Plugrá or Bergère—it has higher fat content (82-86%) that makes all the difference.
Can I make this cake in a single layer instead of three?
For a single 9×13-inch sheet pan, reduce the baking time to 40-45 minutes at 350°F. The cake will spread more, so bake until the edges are golden and a toothpick comes out clean. Just be aware the layers won’t be as dramatic, and you’ll need to adjust your syrup basting to the larger surface area. The flavor and moisture will still be excellent!
What causes cracks in pound cake, and how do I prevent them?
Cracks usually appear when the cake bakes too quickly or the oven temperature fluctuates. To prevent them: 1) Use a water bath (place your cake pan in a larger pan with 1 inch of hot water), 2) Avoid opening the oven door during baking, and 3) Rotate pans halfway through. The simple syrup basting also helps seal the surface. If cracks do appear, they’re purely cosmetic—the cake will still be delicious!
Can I substitute oil for butter in this recipe?
Not recommended! Oil lacks the flavor and structure that butter provides. If you must substitute, use an equal amount of melted butter (not oil) and reduce the water in the simple syrup by 1 tablespoon. The texture will be slightly different, but you’ll still get a tender cake. For best results, stick with the traditional butter method—it’s what makes this pound cake legendary.
How do I store leftovers to keep them moist?
Wrap the cake tightly in plastic wrap and store at room temperature for up to 5 days. For longer storage, refrigerate for 2 weeks or freeze slices for 3 months. To refresh stale slices, warm them in a 200°F oven for 10 minutes with a splash of water in the pan. The simple syrup basting helps maintain moisture, but proper storage is key to keeping every slice tender.

- All Butter Pound Cake Recipe: Ultra-Moist Layers With Vanilla-Infused Depth - October 7, 2026
- Canned Beef BBQ Recipe: Smoky-Sweet Glaze That Caramelizes on the Grill - October 7, 2026
- Paula Deen’s Lasagna Recipe: Layered Cheese and Meat Harmony - October 7, 2026