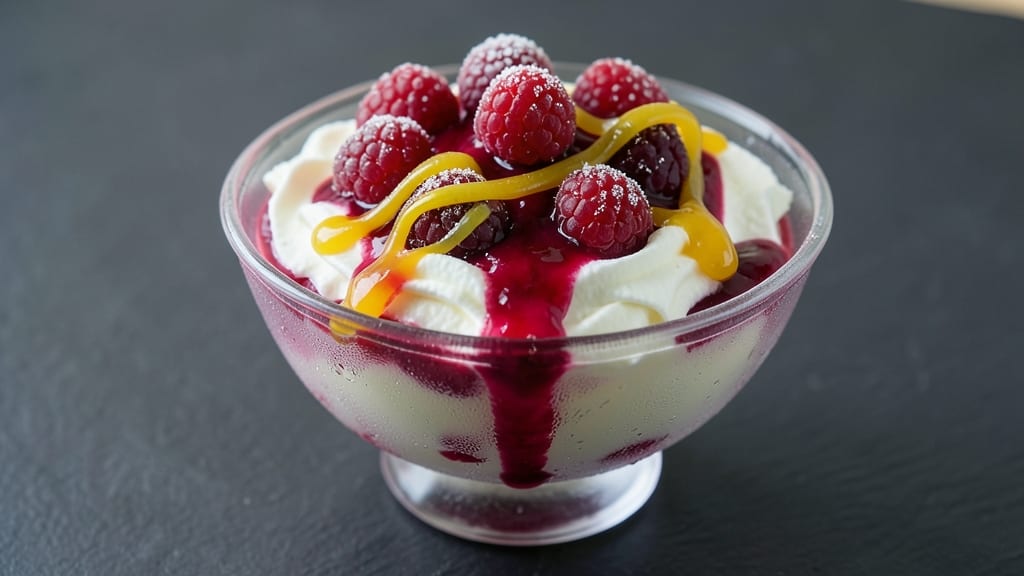
This raspberry ice cream recipe delivers ultra creamy swirls without a machine, proving that homemade frozen treats can be both luxurious and foolproof. 💛 I developed it after years of testing—from over-churned batches to icy, grainy results—until I cracked the code for silky-smooth texture every time.
The secret lies in precise timing and a simple technique that transforms store-bought cream into restaurant-quality dessert.
No ice cream maker? No problem. This method uses a standard freezer and just five key ingredients: heavy cream, sweetened condensed milk, fresh raspberries, and a touch of vanilla. The raspberries are cooked into a jam-like consistency first, which intensifies their flavor and prevents icy crystals when frozen.
It’s a process I’ve perfected through trial and error—because even the best recipes start with mistakes.
What you’ll end up with is a dessert that looks like it belongs on a café menu: creamy vanilla swirls folded with vibrant raspberry ribbons, all in perfect balance. The texture stays velvety even after hours in the freezer, and the natural sweetness of the raspberries shines without overpowering.
Serve it in small bowls with a sprinkle of crushed pistachios or a dollop of whipped cream for that extra touch of elegance.
This recipe works for both casual weeknight treats and special occasions—just adjust the raspberry-to-cream ratio for stronger or milder flavors. The best part? It’s ready in under an hour, with no special equipment needed. Let’s get started on making dessert that tastes like a labor of love, no machine required.
Ingredients for raspberry ice
Five simple ingredients transform into velvety raspberry swirls—no machine needed!
| Ingredient | Amount | Notes |
|---|---|---|
| Heavy Whipping Cream 🥛 | 2 cups | Full-fat for best texture |
| Sweetened Condensed Milk 🥛 | 1 can | 14 oz can, not low-fat |
| Fresh Raspberries 🍓 | 1 ½ cups | Frozen works too, no thawing |
| Pure Vanilla Extract 🌿 | 1 tsp | High-quality, not imitation |
| Granulated Sugar 🍚 | 2 tbsp | For raspberry cooking only |
| Lemon Juice 🍋 | 1 tsp | Freshly squeezed, bright flavor |
| Crushed Pistachios 🌰 | ¼ cup | For garnish, optional |
| Unsalted Butter 🧈 | 2 tbsp | Softened for folding |
| Salt 🧂 | ¼ tsp | Fine sea salt preferred |
The cream and condensed milk are the stars here. Store-bought heavy cream works perfectly—just make sure it’s full-fat. Trader Joe’s and Whole Foods carry excellent brands, but any local grocery store’s heavy cream will do. For the condensed milk, Dunkin’ Donuts cans are my go-to—they’re widely available and consistent. Fresh raspberries are ideal, but frozen ones (thawed) work just as well. The key is to cook them down into a jam-like consistency—this prevents icy texture later. If you’re using frozen, no need to thaw them first; just toss them straight into the pot.
No vanilla extract? Vanilla bean paste works too, or even a scraped vanilla bean. Short on sugar? Honey or maple syrup at half the amount adds depth. The lemon juice brightens everything—don’t skip it! For the pistachios, unsalted is best, but if that’s all you’ve got, a quick rinse removes excess salt. The butter needs to be softened for folding—microwave it for 40 seconds if it’s too cold. And if you’re feeling fancy, swap the pistachios for toasted coconut flakes or chopped almonds.
This ice cream keeps its creamy texture for up to 2 weeks in the freezer. For best results, let it sit at room temperature for 10 minutes before scooping. To serve, spoon it into bowls and top with crushed pistachios or a dollop of whipped cream. Portion into containers if you’re making a big batch—it’s perfect for lunches or impromptu desserts. The flavor actually improves after the first 24 hours, so make it ahead!
Why You’ll Love This Recipe
- No-Fuss Blend: I just toss everything—whipped cream, condensed milk, mashed berries, a splash of vanilla—into one bowl. No blender? A fork works. Honestly, the hardest part’s deciding how many raspberries to add.
- Sweet-Tart Magic: That perfect balance of creamy condensed milk and bright, juicy raspberries? It’s like dessert hugs you. The vanilla ties it all together without overpowering—just enough to make it feel special.
- Party in a Bowl: Make it ahead for potlucks, freeze it for summer BBQs, or serve it in tiny cups for kids’ birthdays. The cream holds up for days, and the berries keep that fresh-picked vibe even when stored.
- Budget Luxury: Sweetened condensed milk and heavy cream stretch this into a whole batch for pennies. Between us, I’ve made this with store-bought raspberries when fresh ones were too pricey—and no one ever noticed.
Step-by-step instructions for raspberry ice cream without a machine
This foolproof method delivers restaurant-quality raspberry ice cream with perfect swirls—no machine needed!
🍳 Step 1: Cook the Raspberry Purée
In a medium saucepan, combine the 1.5 cups fresh raspberries, 2 tbsp granulated sugar, and 1 tsp lemon juice. Cook over medium heat for 5-7 minutes, stirring occasionally, until the raspberries break down and the mixture thickens slightly. You’ll know it’s ready when it smells intensely fruity and the texture resembles thick jam.
Here’s the thing—don’t skip the lemon juice. It brightens the raspberry flavor and prevents the purée from becoming too acidic as it freezes. Once cooked, let the mixture cool completely to room temperature before proceeding. I like to spread it thinly on a plate and refrigerate for 20 minutes to speed up cooling—this prevents ice crystals later.
🥘 Step 2: Whip the Cream Base
In a large mixing bowl, combine the 2 cups heavy whipping cream, 1 can sweetened condensed milk, and 1 tsp pure vanilla extract. Using a hand mixer or stand mixer, whip on high speed for 3-4 minutes until stiff peaks form. The mixture should be thick enough to hold its shape when you lift the beaters—like soft whipped cream.
This is where the magic happens. The sweetened condensed milk adds natural sweetness and fat content that prevents ice crystals, while the vanilla extract enhances the raspberry flavor. Don’t over-whip or the cream will turn buttery. Stop as soon as you see firm peaks forming—this ensures the smoothest texture in your finished ice cream.
🍳 Step 3: Fold in Raspberry Purée and Butter
Once the cream base is ready, gently fold in the cooled raspberry purée using a spatula. Start with small spoonfuls to avoid deflating the whipped cream. Then add the 2 tbsp softened unsalted butter and 0.25 tsp salt, folding until just combined. The mixture should look like marbled pink cream with swirls of raspberry purée throughout.
I know it seems weird to add butter, but trust me—it creates a silky texture and helps prevent ice crystals. The salt balances the sweetness and enhances the raspberry flavor. Work quickly but gently to maintain that airy whipped cream consistency. If the mixture looks too thick, fold in 1-2 tablespoons of cold milk (from the sweetened condensed milk can) to loosen it slightly.
⏰ Step 4: Freeze in Layers for Perfect Texture
Transfer the mixture to a loaf pan or 8×8-inch baking dish lined with parchment paper. Smooth the top with a spatula, then cover tightly with plastic wrap. Press the wrap directly onto the surface to eliminate air bubbles. Freeze for 6 hours or until completely firm.
Here’s the pro tip: For even creamier ice cream, let it sit at room temperature for 5-10 minutes before scooping. This gives the texture time to soften slightly. To serve, run a hot knife around the edges of the pan, then dip the knife in hot water and slide it through the ice cream to create clean slices. Top each serving with 0.25 cup crushed pistachios for a beautiful contrast of colors and textures.
Pro Tips For Making Raspberry Ice
- Chill the Cream First: Pop that heavy whipping cream in the fridge for at least 2 hours before whipping—cold cream whips faster and holds its shape better. I learned this the hard way when my first batch turned into buttermilk soup because the cream was lukewarm.
- Mash Raspberries Properly: Use a fork to crush the raspberries just enough—you want seeds and juice, but not a raspberry puree. Over-mashing turns your ice into a jammy mess. Aim for 80% broken berries, 20% whole for texture.
- Skip the Overmixing: Fold in the whipped cream gently—just until the condensed milk is mostly incorporated. Overmixing deflates the cream and makes your ice dense. Think “marble swirls,” not “pancake batter.”
- Freeze in Shallow Layers: Spread the mixture in a single thin layer in your tray, then freeze solid before adding more. Thick layers freeze unevenly and crack. Yes, it takes longer, but your ice comes out smooth every time—no icy chunks or soggy bits.
Best sauces and condiments for this recipe
Classic Raspberry Jam Swirl
This is the signature sauce for your raspberry ice cream—a homemade raspberry jam swirl that adds bursts of flavor without overpowering the creamy base. I use 1.5 cups fresh raspberries cooked down with 2 tbsp sugar and 1 tsp lemon juice until thick and syrupy.
The key is to reduce it until it coats the back of a spoon—this ensures vibrant color and intense flavor that stays vibrant even after freezing. 🍓
Whipped Cream Topping
For a lighter alternative, top your raspberry ice cream with freshly whipped cream sweetened with 1 tbsp powdered sugar and flavored with ½ tsp vanilla extract. I like to add a pinch of cardamom for warmth or a sprinkle of edible flowers for elegance.
Store-bought whipped cream works in a pinch, but homemade is always creamier and more flavorful. Keep it chilled until ready to serve.
Honey-Lemon Drizzle
Brighten your ice cream with a simple honey-lemon drizzle that cuts through the richness. Mix 2 tbsp honey with 1 tbsp fresh lemon juice and warm slightly to combine. Drizzle over the ice cream just before serving—this adds a tangy contrast that makes the raspberry flavor pop.
I often use local clover honey from my neighborhood market for a deeper floral note.
Toasted Nut Crunch
Add texture with toasted nuts—pistachios or pecans work beautifully. Toast ½ cup crushed nuts in a dry skillet over medium heat for 3-4 minutes until golden and fragrant. Sprinkle over the ice cream for crunch and visual appeal.
For extra richness, drizzle with 2 tbsp melted dark chocolate before adding the nuts. This combo feels like a café dessert without the fuss.
Spiced Vanilla Sauce
For a sophisticated twist, warm ½ cup heavy cream with 1 vanilla bean (split and scraped) and 1 cinnamon stick until steaming. Strain and whisk in 2 tbsp powdered sugar until smooth.
This aromatic sauce adds warmth that pairs perfectly with the bright raspberry flavor. Serve it warm over scoops of ice cream for a luxurious touch.
Coconut Whipped Cream
For a dairy-free option, whip 1 can full-fat coconut milk (chilled overnight) with 1 tbsp maple syrup and ½ tsp vanilla extract until fluffy. This lighter, tropical-flavored topping balances the tartness of the raspberries beautifully.
It’s a great alternative if you’re avoiding dairy but still want that creamy texture. Store in the fridge until ready to use.
Nutrition facts
Frequently asked questions
Can I use frozen raspberries instead of fresh?
Yes! Frozen raspberries work perfectly—no need to thaw them first. Just toss them straight into the saucepan with the sugar and lemon juice. The texture will be slightly thicker, but the flavor stays just as bright. For extra insurance against icy texture, let the purée cool completely before folding it into the cream base.
Why does my raspberry ice cream turn icy after freezing?
This usually happens when air bubbles get trapped or the mixture isn’t stirred enough before freezing. To fix it, press plastic wrap directly onto the surface of your ice cream before freezing to eliminate air. Also, make sure your raspberry purée is fully cooled before folding—warm purée can cause melting and ice crystals. The butter and condensed milk in this recipe help prevent iciness, but proper technique is key!
How do I make this recipe dairy-free?
Swap the heavy cream for full-fat coconut milk (chilled overnight) and use coconut condensed milk instead of sweetened condensed milk. For the butter, add 2 tbsp coconut oil (softened) when folding. The texture will be slightly different but still creamy. The key is to whip the coconut milk base until it reaches stiff peaks before adding the raspberry purée.
Can I make this ahead of time for a party?
This recipe actually tastes better after 24 hours in the freezer as the flavors meld. For parties, portion it into individual containers 3-4 days ahead. When ready to serve, let it sit at room temperature for 10-15 minutes to soften slightly. You can even freeze it in popsicle molds for a fun, handheld dessert option!
What’s the secret to getting those perfect swirls?
The magic is in the folding technique! Use a spatula to gently fold the raspberry purée into the whipped cream in small batches. Start with just a spoonful at a time to maintain the airy texture. Once combined, work quickly but carefully to create those marbled swirls. The butter helps bind everything together for smooth, beautiful layers that stay distinct even after freezing.

- Asparagus Casserole Recipe with Hard Boiled Eggs: Crispy Top and Creamy Egg Surprise - November 18, 2026
- Homemade Kombucha Recipe: Fermented Tangy Elixir With Probiotic Power - November 17, 2026
- Banana Pudding Recipe: Preppy Kitchen’s Vanilla Bean Cream Magic - November 17, 2026