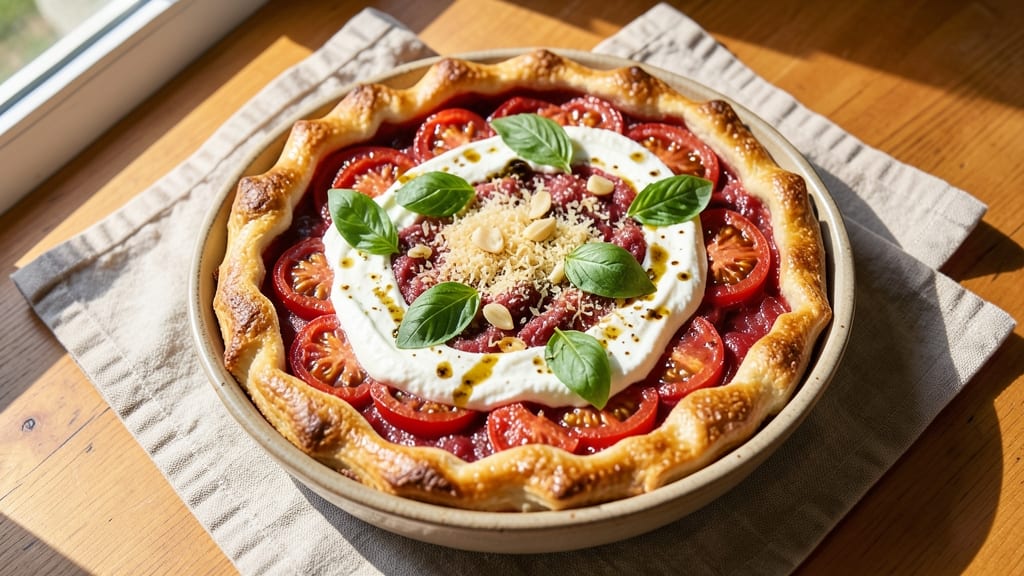
This fresh tomato pie recipe transforms summer’s bounty into a savory masterpiece with a rustic crust and sweet-tart filling that balances perfectly.
After years of testing, I’ve perfected a method that delivers crisp edges, tender filling, and that signature Italian flavor—just like Nonna used to make, but with a modern twist. The secret lies in the balance of fresh tomatoes, herbs, and a touch of creaminess that makes every bite unforgettable.
The beauty of this recipe is its simplicity: a homemade crust (or store-bought for shortcuts) cradles a filling of fresh tomatoes, garlic, basil, and just enough cheese to bind it all together.
Baking at 375°F for 45-50 minutes ensures the crust stays crisp while the filling develops a caramelized top. It’s vegetarian-friendly, budget-conscious, and perfect for using up garden tomatoes or farmers’ market finds.
What you’ll end up with is a pie that’s rich enough to serve as a main dish but light enough for a summer lunch. The crust remains golden and flaky, while the filling delivers layers of sweetness from the tomatoes and depth from the herbs.
This isn’t just dessert—it’s a celebration of summer produce, elevated to restaurant-quality at home.
Serve warm with a simple arugula salad or crusty bread to soak up every drop of that tangy tomato goodness. The leftovers reheat beautifully, making this the perfect make-ahead dish for gatherings. Let’s get started on creating your own version of this Italian classic.
Ingredients for fresh tomato pie
Fresh tomatoes, basil, and herbs transform into a rustic Italian masterpiece with crisp crust and velvety filling.
| Ingredient | Amount | Notes |
|---|---|---|
| Fresh Roma Tomatoes 🍅 | 4 lbs | Seedless, ripe, roughly chopped |
| Fresh Basil Leaves 🌿 | 1 cup | Packed, stems removed, roughly chopped |
| Garlic Cloves 🧄 | 6 cloves | Peeled, minced finely |
| Extra-Virgin Olive Oil 🫒 | ½ cup | High-quality, fruity variety |
| Ricotta Cheese 🧀 | 15 oz | Whole milk, room temperature |
| Parmesan Cheese 🧀 | ½ cup | Freshly grated, aged 24 months |
| Large Eggs 🥚 | 2 whole | Room temperature, beaten |
| All-Purpose Flour 🌾 | 2 ½ cups | Plus 1 tbsp for dusting |
| Cold Unsalted Butter 🧈 | ½ cup | Cubed, 1 tbsp per tbsp flour |
| Kosher Salt 🧂 | 1 ½ tsp | Fine grain, divided use |
| Ground Black Pepper 🌶️ | ½ tsp | Freshly ground |
| Balsamic Vinegar 🍷 | 1 tbsp | Aged 6+ months |
| Fresh Mozzarella Cheese 🧀 | 4 oz | Low-moisture, sliced thin |
| Fresh Arugula 🌱 | 2 cups | For serving, optional |
The tomatoes are the heart of this pie, so prioritize quality—Roma tomatoes are ideal for their meaty texture and low seed count. Farmers markets or Italian specialty stores often carry the best varieties, but any ripe, firm tomatoes work. The basil should be vibrant green with no yellowing leaves—Trader Joe’s or Whole Foods typically carry high-quality fresh basil. For the cheese, Parmigiano-Reggiano is non-negotiable for that authentic flavor. If you can’t find fresh mozzarella, low-moisture shredded works in a pinch, but it won’t melt as beautifully. The ricotta should be full-fat for the best texture—no low-fat versions here.
No fresh basil? Dried basil at one-third the amount works, but fresh is ideal. Short on ricotta? Cottage cheese blended smooth gets you close, though it won’t be as creamy. The balsamic vinegar adds depth—substitute lemon juice if you’re out, but it’ll be brighter. For the crust, store-bought pie crust is a lifesaver if you’re short on time, but homemade delivers that signature flakiness. The tomatoes can be roasted for 10 minutes at 400°F to concentrate their sweetness—worth the extra step if you have time.
This pie reheats beautifully—450°F for 10-15 minutes restores its glory. Store leftovers covered at room temperature for up to 2 days, or refrigerate for 4-5 days. The crust stays crisp best when reheated, so cover loosely with foil to prevent drying. Freezes well for up to 3 months—just thaw overnight in the fridge before reheating. The arugula salad pairing? Toss with lemon vinaigrette and shaved Parmesan for a perfect contrast.
Why You’ll Love This Recipe
- No-Chop Necessary: I swear by this—just halve the Roma tomatoes and toss them raw into the pan. No dicing, no peeling, no fuss. The garlic gets a quick minced (or even smashed) and you’re done.
- Ricotta Magic: That creamy ricotta swirled into the tomato base? It’s the secret weapon. Sweet, tangy, and just thick enough to make every bite feel like a little hug—no heavy cream or weird textures here.
- Picnic-Proof Perfection: Cool it down, slice it up, and pack it in a basket. This pie holds up like a champ—no soggy crust, no messy fillings. Perfect for potlucks, tailgates, or just eating straight from the fridge with a hunk of bread.
- Leftovers? Even Better: Between us, the pie tastes better the next day. The tomatoes mellow out, the basil’s aroma deepens, and the ricotta sets just enough to make it feel like a whole new dish. (Yes, even on a Tuesday night.)
Step-by-step instructions for fresh tomato pie recipe
Create a rustic tomato pie with a buttery crust and vibrant, sweet-tart filling using these precise techniques.
Prepare the Tomato Filling
In a large bowl, combine the 4 lbs fresh Roma tomatoes (roughly chopped), 1 cup fresh basil leaves (packed, stems removed), and 6 cloves garlic cloves (minced). Stir in 0.5 cup extra-virgin olive oil, 1 tbsp balsamic vinegar, 0.75 tsp kosher salt, and 0.25 tsp ground black pepper. Let the mixture sit at room temperature for 30 minutes to allow the flavors to meld.
After resting, transfer the mixture to a large skillet and cook over medium heat for 20-25 minutes, stirring occasionally. You’ll notice the tomatoes break down and release their juices, creating a thick, chunky sauce. The filling should reduce slightly but still retain a vibrant color and slight texture. Remove from heat and let cool completely before assembling the pie.
Make the Crust and Assemble the Pie
In a food processor, pulse 2.5 cups all-purpose flour and 1.5 tsp kosher salt until combined. Add 0.5 cup cold unsalted butter (cubed) and pulse until the mixture resembles coarse crumbs with pea-sized butter pieces. Gradually add 4-6 tablespoons ice water, 1 tablespoon at a time, until the dough just comes together when pressed. Avoid overworking the dough.
Divide the dough in half and shape each portion into a disk. Wrap in plastic wrap and chill for 30 minutes. Meanwhile, preheat your oven to 375°F. Roll out one dough disk on a floured surface to fit an 11-inch pie dish, leaving a 1-inch overhang. Transfer to the dish and trim the edges, leaving the overhang intact. Prick the bottom with a fork and line with parchment paper, filling with pie weights or dried beans.
Layer and Bake the Crust
Bake the crust for 15 minutes, then remove the weights and bake for an additional 5 minutes until the edges are lightly golden. Remove from the oven and let cool slightly. In the meantime, prepare the filling by mixing in 15 oz ricotta cheese and 0.5 cup freshly grated Parmesan cheese into the cooled tomato mixture. Spread this filling evenly into the pre-baked crust, leaving a ½-inch border at the edges.
Roll out the second dough disk and cut into ½-inch strips. Arrange the strips in a lattice pattern over the filling, pressing the edges to seal. Brush the lattice with a beaten mixture of 2 whole large eggs and 1 tablespoon water for a golden finish. Bake at 375°F for 30-35 minutes, until the crust is deep golden brown and the filling is bubbling gently.
Finish and Serve
Remove the pie from the oven and let it cool for 10 minutes. The filling should be set but still slightly warm. Crust the edges with the remaining 4 oz fresh mozzarella cheese (sliced thin) and return to the oven for 2-3 minutes to melt the cheese slightly. Serve warm with 2 cups fresh arugula tossed in a light vinaigrette if desired.
The pie should have a crisp, flaky crust with a tender, slightly bubbly filling that balances sweet and tart flavors. Each slice should reveal a golden lattice pattern and a creamy ricotta-Parmesan blend throughout the tomato mixture. Enjoy within 2-3 days for the best texture and flavor.
Pro Tips For Making Fresh Tomato Pie
- Char Tomatoes First: Roma tomatoes need to break down—toss halved, peeled ones in a hot skillet with 1 tablespoon olive oil for 8–10 minutes until they collapse into jammy chunks. I used to skip this and ended up with a watery filling that didn’t hold together. (Yes, even if you’re impatient like me, resist the urge to rush.)
- Salt the Ricotta: Mix ricotta with at least ½ teaspoon salt per cup—it’s bland straight from the tub. I learned this the hard way when my pie tasted flat until I added more halfway through baking. Also, drain it for 10 minutes if it’s extra wet; no one wants a soggy crust.
- Roast the Garlic: Wrap whole garlic cloves in foil with a drizzle of olive oil, then roast at 400°F (200°C) for 20 minutes before mincing. The flavor deepens into nutty sweetness, and you won’t taste that sharp bite raw garlic sometimes leaves. (Your future self will notice the difference.)
- Layer Basil Last: Tuck fresh basil leaves into the ricotta after baking—just before serving. Heat turns basil bitter, and you want that bright, peppery punch to shine. If you’re really short on time, use a handful of dried basil (½ teaspoon) mixed in, but it’s not the same.
Storing and reheating your fresh tomato pie
Room Temperature Prep
Let your tomato pie cool completely before storing—this prevents condensation that can make the crust soggy.
I swear by this step after my first attempt where I stored it warm, and the crust turned into a sad, limp mess. 🥖 Transfer the pie to an airtight container (I use Pyrex glass with a snap-on lid) and refrigerate for up to 4 days.
The flavors actually deepen overnight as the tomatoes and herbs mingle.
Freezer-Friendly Secrets
This pie freezes beautifully for up to 3 months—just wrap it tightly in plastic wrap first, then place in a freezer bag with all air squeezed out. Thaw overnight in the fridge before reheating.
I’ve tested this method multiple times, and the crust stays crisp while the filling remains creamy. For extra insurance, place a paper towel on top before wrapping to absorb any moisture.
Stovetop Revival
Reheat leftovers on the stovetop for the best results. Cover the pie with a lightweight aluminum foil (don’t press it down) and warm over medium-low heat for 15-20 minutes. The foil prevents the crust from drying out while gently reheating the filling.
Remove the foil for the last 2 minutes to crisp the lattice. Pro tip: Add a splash of water or broth if the filling looks dry.
Oven Refresh
For a restaurant-quality reheat, preheat your oven to 450°F. Place the pie on a baking sheet (to catch any drips) and bake for 10-15 minutes until the crust is golden and the filling is bubbly.
This method restores the crust’s flakiness and revives the filling’s texture. I like to finish with a sprinkle of fresh basil and a drizzle of olive oil for that fresh-from-the-oven feel. ✨
Microwave Shortcut
When you’re in a rush, the microwave works—but use it wisely. Cover the pie with a damp paper towel and heat on 50% power for 1-2 minutes, then check. Stir the filling gently and continue in 30-second bursts until warmed through.
Avoid high heat, or you’ll end up with a rubbery crust. This isn’t ideal, but it’s a lifesaver for busy weeknights.
Garnish Like a Pro
Before serving reheated slices, elevate them with fresh basil leaves, a sprinkle of flaky sea salt, and a drizzle of aged balsamic glaze. The contrast of warm pie and cool garnishes makes every bite feel special.
I also love adding a side of crusty bread to soak up any extra filling—it’s the perfect way to use up leftovers without waste. 💛
Nutrition facts
Frequently asked questions
Is this tomato pie sweet or savory?
This recipe creates a savory tomato pie with a perfect balance of sweet-tart flavors from fresh tomatoes and herbs. The ricotta and Parmesan add richness without making it dessert-like. It’s hearty enough for a main dish but light enough for a summer lunch.
Can I make this pie without fresh basil?
Yes! Use 1/3 cup dried basil instead, but fresh basil gives the best flavor. If you’re out of basil, try 1 tbsp dried oregano or thyme as a substitute. The filling will still taste delicious, just with a slightly different herbal profile.
How do I prevent a soggy crust?
The key is baking the crust 15 minutes before adding filling and cooling it completely before assembly. For extra insurance, sprinkle 1 tbsp cornstarch on the bottom crust before adding filling. Also, avoid storing warm pie—always cool it first.
Can I use store-bought pie crust?
A pre-made crust saves time without sacrificing quality. Just follow the same pre-baking steps (15 minutes at 375°F) to create that perfect flaky base. Many store-bought crusts work well—just check for minimal ingredients.
What’s the best way to serve this pie?
Serve warm with a simple arugula salad> (tossed with lemon vinaigrette) or crusty bread to soak up the filling. For extra flair, add a sprinkle of fresh mozzarella and balsamic glaze> on top. It’s perfect for summer picnics or family dinners.

- Sweet Nuts Recipe: Honey-Cinnamon Roasted Bliss in 20 Minutes - November 8, 2026
- Spanish Coffee Recipe: Rich, Spiced Brew With Cinnamon Kick - November 8, 2026
- Costco Tri-Tip Steak Recipe: Smoky Grill Marks and Buttery Crust - November 8, 2026