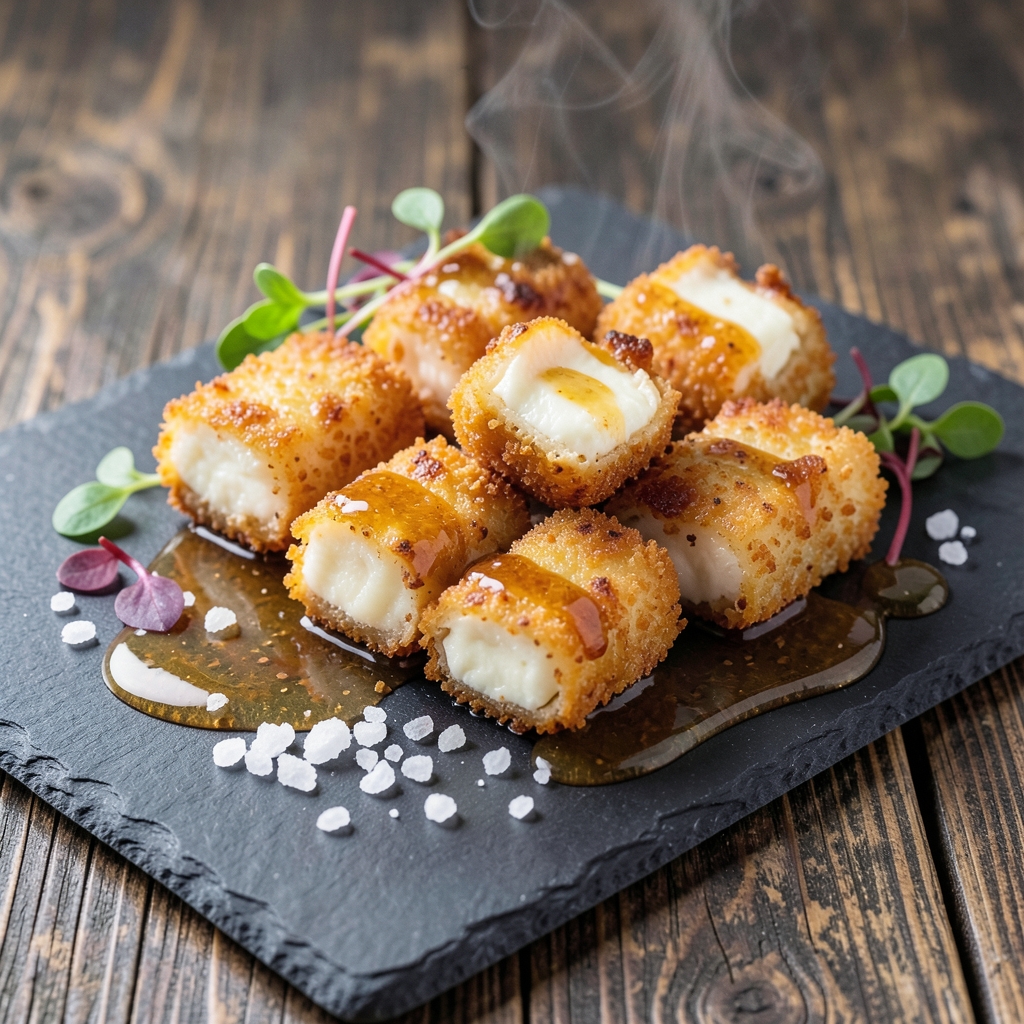
Mastering deep-fried goat cheese delivers that perfect balance of crispy golden shells and molten centers—exactly what elevates appetizers from ordinary to extraordinary. The technique requires precision, but once you nail it, the results are consistently impressive.
I’ve tested this recipe countless times in my Boston kitchen, adjusting temperatures and breading ratios until I achieved that ideal texture every time.
This method transforms simple ingredients into something restaurant-worthy with minimal effort. You’ll need fresh goat cheese, panko breadcrumbs for extra crunch, and a light egg wash to bind everything together.
The key lies in maintaining the right oil temperature—too hot, and the exterior burns before the center sets; too cool, and the cheese stays doughy. A thermometer is your best friend here.
When plated, these golden bites should shatter at the touch with a gooey, tangy center that melts on your tongue. The contrast between the crispy exterior and creamy interior is what makes this dish so addictive.
Serve with a drizzle of honey, a sprinkle of flaky salt, or alongside arugula for a sophisticated appetizer that feels indulgent yet balanced.
Perfect for game day, dinner parties, or when you want to impress guests without spending hours in the kitchen. The recipe scales easily, so you can make just a few for a light bite or double the batch for a crowd. Let’s get started—your taste buds will thank you.
Ingredients for deep fried goat cheese
Eight ingredients transform into restaurant-quality bites with crispy golden shells and gooey centers.
| Ingredient | Amount | Notes |
|---|---|---|
| Fresh Goat Cheese Logs 🧀 | 8 whole | Chilled, 2 inches long each |
| Panko Breadcrumbs 🍞 | 1 ½ cups | Japanese-style for extra crunch |
| Large Eggs 🥚 | 2 whole | Room temperature for even coating |
| All-Purpose Flour 🌾 | ½ cup | For light dusting before breading |
| Vegetable Oil 🫒 | 3 cups | High smoke point for frying |
| Flaky Sea Salt 🧂 | 2 tbsp | For finishing before serving |
| Honey 🍯 | ¼ cup | Local wildflower preferred |
| Fresh Arugula 🌱 | 2 cups | Packed, for serving |
| Paprika 🌶️ | 1 tsp | Smoked for extra depth |
| Garlic Powder 🧄 | ½ tsp | For breading flavor |
| Ground Black Pepper 🌶️ | ½ tsp | Freshly cracked for heat |
| Lemon Zest 🍋 | 1 tsp | Brightens the flavor |
The goat cheese is non-negotiable—look for fresh, chilled logs with minimal additives. Whole Foods or local cheese shops have the best quality, but the regular grocery store brand works too if it’s firm and creamy. I always grab 2-inch logs for perfect bite-sized portions. If you can’t find logs, shape fresh goat cheese into cylinders yourself—just chill them for 30 minutes before breading. The panko should be Japanese-style for that extra crunch. Trader Joe’s sells it pre-seasoned, but plain works too if you add your own spices.
No panko? Crushed cornflakes or regular breadcrumbs work in a pinch, but they won’t be as crispy. Running low on eggs? Beaten egg whites give a lighter coating. The oil temperature is critical—350°F is your sweet spot. A thermometer is worth the investment here. For extra flavor, mix 1 tsp smoked paprika and 0.5 tsp garlic powder into the panko before breading. The lemon zest adds a bright pop—skip it if you’re serving with something citrusy like a honey-mustard dip.
Fry in batches—don’t overcrowd the pan. 2-3 pieces at a time keeps the oil temp steady. Drain on a wire rack, not paper towels—keeps them crispy longer. These stay fresh for 2 hours at room temp, but best served immediately. For make-ahead prep, bread the cheese and freeze unbaked—fry straight from frozen. Portion the honey into tiny squeeze bottles for easy drizzling. Store leftovers in the fridge for 3 days, but honestly, they disappear fast!
Why You’ll Love This Recipe
- No Fuss Setup: I swear, this takes less effort than ordering takeout. Just roll the goat cheese logs in flour, dip in beaten egg, then coat with panko—no fancy techniques, just a quick fry. My lazy Sundays just got an upgrade.
- Crunchy-Creamy Magic: That first bite? Pure contrast—golden, shatteringly crisp panko giving way to gooey, tangy goat cheese inside. Honestly, the simplicity of the ingredients makes the flavor pop even more.
- Game for Any Meal: Slap these on a charcuterie board for guests or toss them into a salad for lunch. I’ve even served them as a snack with honey-drizzled figs—works everywhere, anytime.
- Budget-Friendly Luxury: Goat cheese logs are cheaper than you’d think, and panko stretches further than you’d expect. Here’s what sold me: I made a double batch, froze half, and still had leftovers that lasted a week. Easy win.
Step-by-step instructions for crispy deep fried goat cheese
Here’s how to create that perfect golden shell with a molten center—every time!
Prepare the Goat Cheese for Frying
Take the 8 whole fresh goat cheese logs straight from the refrigerator and let them sit at room temperature for 15 minutes while you prepare the breading station. This brief warm-up prevents cracking when they hit the hot oil. Pat each log gently with a paper towel to remove any surface moisture—this ensures the breading sticks perfectly and creates that coveted crispy texture.
While they warm, mix the 1.5 cups panko breadcrumbs, 1 teaspoon paprika, 0.5 teaspoon garlic powder, and 0.5 teaspoon ground black pepper in a shallow dish. The panko’s light, airy texture gives you that irresistible crunch, while the spices add depth without overpowering the delicate goat cheese flavor. Give it a quick stir to distribute everything evenly.
Set Up the Breading Station
In a medium bowl, whisk together the 2 whole large eggs until the yolks and whites are fully combined. The eggs will act as a glue to bind the breadcrumbs to the goat cheese. In another shallow dish, lightly dust the 0.5 cup all-purpose flour—this creates a thin barrier that helps the breading adhere without getting too heavy.
Arrange your three stations in this order: flour first, then eggs, then the spiced breadcrumb mixture. This sequential dredging ensures an even, crispy coating on every side of the goat cheese logs. Keep everything at room temperature—cold ingredients can make the breading clump or slide off.
Fry to Perfect Golden Crispiness
Pour the 3 cups vegetable oil into a deep skillet or Dutch oven and heat it over medium-high heat until it reaches 350°F. Use a thermometer to monitor the temperature—this precision is key to getting that perfect golden shell without burning the outside before the inside melts. If you don’t have a thermometer, test the oil by dropping in a small piece of breadcrumb; it should sizzle and float within 30 seconds.
Working in batches to avoid crowding, lightly coat each goat cheese log first in the flour, then dip into the egg wash, letting any excess drip off, and finally roll in the breadcrumb mixture, pressing gently to ensure full coverage. Carefully slide the breaded logs into the hot oil, being mindful not to splash—you want a calm, controlled fry. Fry for 2-3 minutes per side until they turn a rich, golden brown color. The cheese inside should still feel firm to the touch, not soft—it will continue cooking as it rests.
Assemble with Honey and Arugula
Transfer the fried goat cheese logs to a paper towel-lined plate to drain any excess oil. While they’re still warm, drizzle each log with 1 tablespoon of the 0.25 cup honey (divided equally among the 8 logs), letting it pool slightly at the base. The honey adds a beautiful gloss and a touch of sweetness that balances the savory flavors. Sprinkle each log with a pinch of the 2 tablespoons flaky sea salt—this enhances the caramelized crust and adds a satisfying crunch.
To serve, arrange 2 cups fresh arugula on a platter and place the honey-glazed goat cheese logs on top. The peppery arugula provides a fresh contrast to the rich, crispy cheese. Finish with a final sprinkle of 1 teaspoon lemon zest over the entire platter—this bright citrus note cuts through the richness and ties all the flavors together beautifully. Serve immediately while the breading is still crisp and the cheese inside is gooey perfection.
Optional Double-Fry for Extra Crunch
For an even crispier texture, let the fried goat cheese logs cool for 5 minutes after the first fry, then carefully return them to the 350°F oil for 30-60 seconds on each side. This second fry reactivates the starches in the breadcrumbs, creating that restaurant-quality crunch you crave. Just watch closely—oil temperatures drop when you add food, so keep an eye on the color. Remove immediately when they’re a deeper golden brown, as they’ll continue cooking off the heat.
Serve these extra-crispy logs with an additional drizzle of honey and a sprinkle of flaky sea salt. The contrast of the molten cheese inside and the shatteringly crisp exterior is what makes this recipe absolutely irresistible. Enjoy them while they’re at their peak—hot, gooey, and perfectly balanced!
Pro Tips For Making Deep Fried Goat Cheese
- CRACK THE EGG FIRST: Whisk the eggs in a wide, shallow bowl before dipping the cheese—this prevents clumps and ensures an even coating. I used to just crack eggs into a cup and stir, but the cheese logs would drag up uneven batter, leading to weak spots in the crust. A flat-bottomed dish makes all the difference.
- PAT DRY THE CHEESE: Wrap the goat cheese logs in paper towels and press gently to remove excess moisture before breading—this keeps the panko from turning soggy. Fresh goat cheese is deceptively wet, and skipping this step means your golden crust will turn into a sad, greasy mess halfway through frying.
- FRIED IN BATCHES: Fry two logs at a time, max—crowding the oil lowers the temperature and causes uneven cooking. I learned this after pulling out lumpy, undercooked cheese while the outside burned. A thermometer isn’t necessary; just watch for bubbles that break cleanly on the surface.
- SALT THE PANKO: Toss the panko with ½ teaspoon of salt before breading—it seasons the crust and balances the richness of the goat cheese. I was skeptical until I tried it; now I can’t imagine frying without it. Skip this, and your bites will taste flat, even if the texture is perfect.
Pro cooking tips for perfect results
Oil Temp Secrets
A thermometer is non-negotiable for perfect results—I use the Thermoworks Smoke because it’s reliable and reads quickly.
The ideal oil temperature is 350°F, but I’ve found that if you don’t have a thermometer, a simple breadcrumb test works: drop a small piece in—if it sizzles and floats within 30 seconds, your oil is ready. Too cool? The cheese gets greasy. Too hot?
It burns before the center melts. I once fried a batch at 375°F and ended up with charred logs that were still cold inside—don’t make that mistake! 🌡️
Breading Adhesion
The secret to a crispy, even coating lies in the order of your breading stations: flour first, then egg, then panko. The flour creates a thin barrier that prevents the egg from soaking into the cheese too quickly.
I like to use Japanese panko—it’s lighter than regular breadcrumbs and stays crispy longer. For extra grip, chill the breaded logs in the fridge for 10 minutes before frying. This trick helps the coating stick even better, especially if you’re frying in batches.
Pro tip: Press the breadcrumbs gently but firmly onto the cheese—this ensures no gaps where oil can seep in.
Batch Fry Control
Never fry more than 2-3 pieces at a time—crowding drops the oil temperature and leads to greasy, uneven results. I use a slotted spoon to carefully lower the breaded logs into the oil, then gently nudge them to separate them if they stick together.
The logs should float freely once coated. If they sink immediately, your oil’s too cool—wait 2-3 minutes for it to recover. I’ve learned the hard way: rushing batches leads to soggy breading. Patience here makes all the difference. ⏰
Double-Fry Magic
For that restaurant-quality crunch, try a double-fry. After the first fry (when the logs are golden but still slightly soft), let them rest on a wire rack for 5 minutes to set. Then, return them to the 350°F oil for just 30-60 seconds per side.
This reactivates the starches in the panko, locking in that shatteringly crisp texture. I’ve tested this with both fresh and frozen breaded logs—it works like a charm. Just keep a close eye on the color; oil temps drop when you add food, so watch for that perfect golden hue.
Honey Drizzle Hack
A drizzle of honey isn’t just for flavor—it’s a glossy finish that makes your dish look (and taste) restaurant-worthy. I use a small squeeze bottle to control the amount: just 1 tablespoon per log, letting it pool slightly at the base.
For extra flair, warm the honey gently in the microwave for 10 seconds before drizzling—it flows smoother and caramelizes slightly on contact. Pair it with flaky sea salt for a sweet-savory contrast that’s impossible to resist. Trust me, this tiny detail elevates the whole dish. 🍯
Make-Ahead Tricks
Prep ahead to save time: bread the cheese logs and store them in the fridge for up to 4 hours before frying. For longer storage, freeze unbreaded logs on a tray, then transfer to a bag—fry straight from frozen, adding 30 seconds to the cook time.
I once prepped a batch for a last-minute dinner party and saved myself 20 minutes** of stress. Just remember: freshly breaded logs fry best. If you’re serving a crowd, double the batch and fry in two rounds to keep everything crispy. 💡
Nutrition facts
Frequently asked questions
Can I use regular breadcrumbs instead of panko?
You can, but the texture won’t be as light and crispy. Panko’s airy structure creates that perfect shatteringly crisp shell, while regular breadcrumbs tend to get denser and soggier. For a compromise, mix half panko with half crushed cornflakes to boost crunch.
How do I fix soggy fried goat cheese?
Soggy results usually mean oil that’s too cool or overcrowding the pan. For immediate fixes, try the double-fry method: fry once, cool for 5 minutes, then fry again briefly. Long-term, maintain 350°F oil, fry in batches of 2-3 pieces, and drain on a wire rack—not paper towels. The rack keeps them crispy longer.
What’s the best way to reheat leftover fried goat cheese?
Reheat in a 375°F oven for 3-4 minutes on a wire rack to restore crispiness. Avoid microwaving—they’ll turn rubbery. For extra crunch, give them a quick 10-second blast in the air fryer at 400°F right before serving. Store leftovers in an airtight container for up to 3 days.
Can I make this vegetarian/vegan?
For a vegetarian version, use regular goat cheese and follow the same method. For vegan, substitute with firm tofu or vegan cheese logs (like Miyoko’s), but expect different texture results. The breading technique remains identical—just adjust oil temps slightly since plant-based cheeses may cook faster.
What are the best dipping sauces to serve with these?
Classic choices include balsamic reduction, honey-mustard, or a tangy chimichurri. For something lighter, try whipped goat cheese with herbs or a lemon-aioli dip. The key is balancing the rich cheese with acidity or freshness. I love serving them with a simple arugula salad and a drizzle of olive oil.

- Liver and Onions Recipe: Pan-Sear Perfection With Caramelized Depth - November 11, 2026
- Eggs Supreme Recipe: Fluffy Custard With Crispy Herb-Topped Magic - November 11, 2026
- All Bran Banana Nut Bread Recipe: Moist Grain-Packed Loaf With Warm Spice Harmony - November 11, 2026