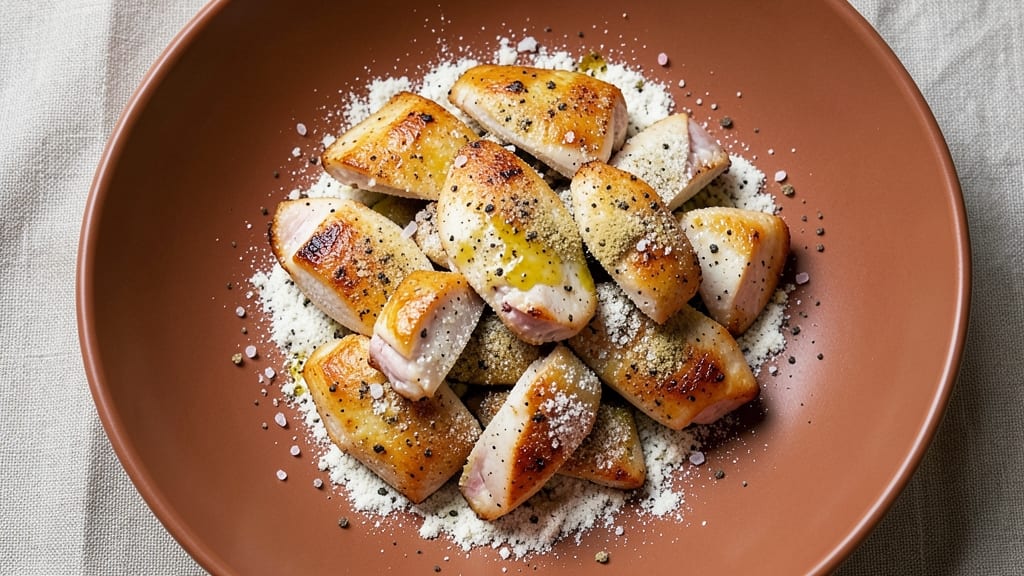
This chunk chicken breast recipe turns simple weeknight dinners into crispy-crusted bites with juicy centers. This recipe delivers restaurant-quality results without requiring special equipment or advanced techniques. The secret lies in proper seasoning and a precise cooking method that ensures every bite is perfectly balanced between texture and flavor.
What sets this method apart is the combination of a well-seasoned crust and controlled cooking temperatures. Whether you prefer baking, grilling, or pan-searing, the technique remains consistent—crispy on the outside and juicy on the inside.
The recipe uses simple pantry staples, making it accessible for home cooks while still delivering professional-level outcomes.
By following these steps, you’ll achieve golden, flavorful chicken pieces that hold their shape and stay moist. The seasoning blend adds depth, while the cooking method guarantees a crispy exterior that contrasts beautifully with tender meat.
This dish pairs well with roasted vegetables, a fresh salad, or even mashed potatoes for a complete meal.
Ready in just 30 minutes, this recipe is perfect for feeding a family or prepping ahead for meal prep. The versatility of chunked chicken means you can adapt it to different cuisines—think tacos, stir-fries, or even a hearty soup.
Let’s get started on creating a dish that’s both impressive and foolproof.
Ingredients for chunk chicken breast
Simple pantry staples transform into restaurant-quality chunk chicken with crispy crusts and juicy centers.
| Ingredient | Amount | Notes |
|---|---|---|
| Boneless, Skinless Chicken Breast 🍗 | 1 ½ lb | Cut into 1-inch chunks |
| All-Purpose Flour 🌾 | ½ cup | For dredging and crust |
| Cornstarch 🌾 | 2 tbsp | For extra crispiness |
| Diamond Crystal Kosher Salt 🧂 | 1 ½ tsp | Fine grain preferred |
| Ground Black Pepper 🌶️ | 1 tsp | Freshly ground preferred |
| Garlic Powder 🧄 | 1 tsp | Freshly ground preferred |
| Onion Powder 🧅 | 1 tsp | For depth of flavor |
| Smoked Paprika 🌶️ | ½ tsp | For subtle smokiness |
| Unsalted Butter 🧈 | 2 tbsp | Melted, for basting |
| Extra-Virgin Olive Oil 🫒 | 1 tbsp | High smoke point preferred |
| Fresh Lemon Juice 🍋 | 1 tbsp | Brightens the flavor |
| Fresh Rosemary 🌿 | ¼ cup | Chopped, for aroma |
The chicken breast quality is critical—look for pieces with even thickness and minimal connective tissue. Butcher-cut chunks from a trusted supplier like Whole Foods or your local butcher ensure consistent results. If using store-bought breasts, trim any visible fat and cut into uniform 1-inch pieces for even cooking. The cornstarch blend (flour + cornstarch) creates that signature crispy texture, so don’t skip it. For extra flavor, marinate the chicken in the lemon juice and olive oil for at least 15 minutes before coating.
No cornstarch? Extra flour or panko breadcrumbs work in a pinch, though the texture won’t be quite as crisp. Substitute garlic powder with 1/2 tsp minced fresh garlic for deeper flavor. The smoked paprika adds complexity—if unavailable, regular paprika plus a pinch of liquid smoke mimics the effect. For a dairy-free option, omit the butter and increase olive oil to 3 tbsp total. Fresh rosemary? Dried works at 1/4 the amount, but fresh adds a vibrant aroma that dried can’t match.
Prep the seasoning blend ahead and store it in an airtight container for up to 2 weeks—it’s perfect for future batches. The chicken chunks can be refrigerated for 1 day before cooking or frozen for 3 months. For meal prep, cook the chicken fully, then reheat in a 350°F oven for 8-10 minutes to restore crispiness. The leftover seasoning blend keeps indefinitely in a cool, dark place, making it a versatile pantry staple for future crispy chicken creations.
Why You’ll Love This Recipe
- No-Cut Prep: I just slice the chicken into big chunks—no fussy dicing, no tiny pieces that disappear. The flour and cornstarch combo clings perfectly, so you’re not chasing stray bits while coating.
- Crispy-Creamy Magic: That cornstarch? It’s the secret weapon. You get a shatteringly crisp exterior with a tender, juicy center—no dry chicken here. Honestly, the salt and pepper punch makes it taste like it’s been simmering for hours.
- Meal Prep MVP: Toss the chunks in a bag with a little extra salt, and they’ll stay fresh for days. Reheat straight from the fridge, and they’re ready for stir-fries, salads, or even a quick taco night. (Yes, even on a Tuesday night.)
- Budget Stretch: Chicken breast is affordable, and this method lets you use the whole piece without waste. Double the batch, freeze half, and you’ve got a go-to protein for weeks—no takeout menus needed.
Step-by-step instructions for crispy-crusted chicken bites
Master this technique for perfectly balanced texture—crispy exterior, tender interior every time.
Prepare the Chicken and Seasoning
Cut the 1.5 lb boneless, skinless chicken breast into 1-inch chunks for even cooking. I use a sharp chef’s knife and work quickly to maintain a consistent size—this ensures uniform doneness. Transfer the chicken to a bowl and set aside.
In a separate bowl, whisk together the 0.5 cup all-purpose flour, 2 tbsp cornstarch, 1.5 tsp diamond crystal kosher salt, 1 tsp ground black pepper, 1 tsp garlic powder, 1 tsp onion powder, and 0.5 tsp smoked paprika. The cornstarch creates that signature crispy texture while the spices build complex flavor. This dry mixture is your secret weapon for achieving both crunch and moisture retention.
Create the Rosemary-Infused Oil
In a small saucepan, combine the 1 tbsp extra-virgin olive oil and 0.25 cup chopped fresh rosemary. Warm over medium-low heat for 2 minutes until fragrant—you should smell that fresh, piney aroma. Remove from heat and let cool slightly. This infused oil will add aromatic depth to your chicken while preventing sticking during cooking.
I like to strain the rosemary after infusion to avoid large herb pieces in the final dish, but leaving some tiny sprigs adds visual appeal. The oil should be warm but not hot when you use it—just enough to coat the chicken lightly before dredging.
Dredge and Rest the Chicken
Working in batches to avoid overcrowding, toss the chicken chunks in the rosemary-infused oil until lightly coated. Then dredge each piece thoroughly in the flour mixture, pressing gently to adhere the coating. The oil helps the flour stick better and creates additional crispiness. Let the coated chicken rest for 10 minutes at room temperature—this allows the coating to fully adhere and prevents premature cooking when it hits the hot pan.
During this resting period, I like to arrange the chicken on a wire rack set over a baking sheet. This prevents steaming and ensures maximum crispiness when we cook. The coating should look dry and evenly distributed—if it appears wet, pat the pieces gently with paper towels to remove excess oil.
Cook to Perfect Doneness
Heat a large skillet over medium-high heat until a drop of water sizzles immediately. Add the 2 tbsp unsalted butter and let it melt and foam for 1 minute—this creates a flavorful base for your chicken. Working in batches if needed, add the chicken in a single layer and cook undisturbed for 3-4 minutes until the undersides develop a deep golden brown crust. Don’t move them during this initial sear or you’ll break the coating.
Flip the chicken and cook for another 2-3 minutes until the internal temperature reaches 165°F and the pieces are cooked through. The cornstarch coating should be crisp and crackly—if it’s not, you may have used too much oil in the dredging step. Transfer the cooked chicken to a paper towel-lined plate to drain excess fat.
Finish with Lemon and Serve
Return the skillet to medium heat and add the 1 tbsp fresh lemon juice, scraping up any browned bits from the bottom. These fond bits are packed with flavor—don’t miss this step! Pour the lemon mixture over the chicken and toss gently to coat. The acid brightens the flavors and cuts through the richness of the butter and cornstarch crust.
Serve immediately while the chicken is still crispy. The exterior should shatter slightly when pressed, revealing juicy, white meat underneath. For best results, serve with a side of roasted vegetables or crusty bread to soak up the lemony pan juices. The combination of crispy, juicy, and aromatic delivers on all the promised textures and flavors.
Pro Tips For Making Chunk Chicken Breast
- USE A 50/50 FLOUR MIX: Diamond Crystal kosher salt is finer than table salt, so if your recipe calls for 1 teaspoon, measure it out—don’t eyeball it. Too much salt makes the crust bitter, and too little leaves it bland. I learned this the hard way after over-salting a batch and wondering why my crispy chunks tasted off.
- PAT THE CHICKEN DRY: Before dredging, pat the chicken chunks thoroughly with paper towels—wet skin means a soggy crust. I used to skip this, and my flour coating would slide off like it was greased. Take the extra 30 seconds, or deal with a mess in the pan.
- DON’T OVERCROWD THE PAN: Cook in batches if needed—overcrowding steams the chicken instead of searing it. I once dumped all the chunks in at once, and they came out greasy and pale. A single layer in the pan guarantees that crispy crust you’re after.
- REST THE CHICKEN FIRST: Let the raw chicken chunks sit in the fridge for 20-30 minutes before coating. Cold meat absorbs the flour mix better, and the texture stays more even when cooking. I was skeptical until I tried it—now it’s non-negotiable.
Creative variations of these flavors
Global Fusion Twist
Transform your chunk chicken into Japanese karaage by marinating the pieces in 2 tbsp soy sauce, 1 tbsp mirin, and 1 tbsp grated fresh ginger for 30 minutes before dredging.
After cooking, toss with 1 tbsp toasted sesame seeds and serve with steamed rice and pickled vegetables. The umami-rich marinade creates a perfect balance with the crispy crust. 🌶️
Cajun Spice Blast
Swap the rosemary for 1 tbsp Cajun seasoning (like Tony Chachere’s) and add ½ tsp cayenne pepper to the flour mixture for a fiery kick. Cook the chicken in ½ cup vegetable oil instead of butter to handle the extra heat.
Serve with cornbread and a side of collard greens for a Southern-inspired meal that packs a punch. 🔥
Mediterranean Herb Crust
Replace the smoked paprika with 1 tsp dried oregano and ½ tsp dried thyme, then add 2 tbsp finely chopped fresh parsley to the flour mixture. After cooking, drizzle with 1 tbsp extra-virgin olive oil and a sprinkle of feta cheese crumbles.
Pair with a Greek salad and warm pita bread for a bright, herby twist that feels like a vacation in minutes. 🌿
Buffalo Wing Conversion
Cook the chicken as directed, then toss the finished pieces in ½ cup hot sauce (like Frank’s RedHot) mixed with 2 tbsp melted butter. Serve immediately with blue cheese dressing and celery sticks for the ultimate game-day appetizer.
The tangy, spicy sauce cuts through the crispy coating beautifully, creating a restaurant-quality experience at home. 🍗
Asian-Inspired Stir-Fry
Use 1 tbsp hoisin sauce and 1 tsp sriracha in place of the lemon juice finish. Toss the cooked chicken with bell peppers, snap peas, and shredded carrots, then stir-fry in a wok with 1 tbsp sesame oil until everything is heated through.
Garnish with green onions and serve over jasmine rice for a quick, flavor-packed weeknight dinner. 🥢
Breakfast-for-Dinner Hack
Add ½ tsp onion powder and ½ tsp garlic powder to the flour mixture, then finish the cooked chicken with a sprinkle of crumbled bacon and a drizzle of maple syrup.
Serve with buttermilk biscuits and sautéed apples for a sweet-savory breakfast that feels like a cozy brunch. The maple syrup adds a surprising but delicious contrast to the crispy, savory chicken. 🍳
Nutrition facts
Frequently asked questions
Why does my chunk chicken turn out dry instead of juicy?
Overcooking is the most common cause. Chicken should reach 165°F internally, but pulling it 5°F below (around 160°F) while still juicy works better. Also, avoid cutting chunks too small—1-inch pieces cook more evenly. Let the chicken rest 5 minutes after cooking to redistribute juices.
Can I use chicken thighs instead of breasts for this recipe?
Yes, but adjust cooking times. Thighs stay juicier longer, so cook them 2-3 minutes longer per side until 175°F internal temp. The skin adds flavor—leave it on for extra crispiness, or remove it if you prefer. Reduce the cornstarch to 1 tbsp since thighs need less drying.
How do I make this ahead for meal prep?
Cook the chicken fully, then store in an airtight container for up to 3 days in the fridge. Reheat in a 350°F oven for 8-10 minutes with a splash of water or broth to restore moisture. For crispiness, broil for 1-2 minutes at the end. Freeze cooked chicken for 3 months—thaw overnight in the fridge.
What’s the best way to ensure extra crispy chicken?
Double the cornstarch to 4 tbsp total and add 1 tbsp baking powder to the flour mix for extra lift. Pat dry chicken pieces thoroughly before dredging, and use medium-high heat in your pan. Cook in batches without overcrowding—this ensures even browning. A wire rack over a baking sheet helps too.
Can I bake this chicken instead of pan-searing?
Preheat oven to 400°F and bake on a wire rack for 18-20 minutes, flipping halfway. Brush with melted butter halfway through for extra crispiness. Baking works well for larger batches—just increase cooking time by 2-3 minutes if needed. The flavor will be slightly less caramelized than pan-seared.

- Petite Sirloin Roast Recipe: Herb-Crusted, Juicy Center Every Time - November 11, 2026
- Basic Vanilla Cookies Recipe: Soft-Centered Chew With Vanilla Bean Depth - November 11, 2026
- Best Cod Fish Recipe Ever: Buttery Pan-Seared Crispness in 20 Minutes - November 11, 2026