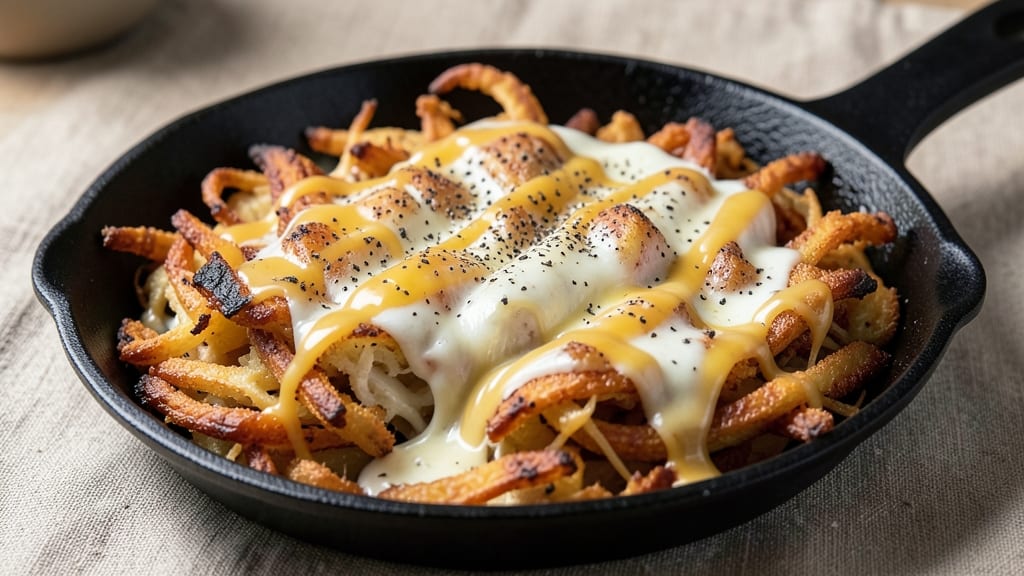
Mastering cheese hashbrowns means balancing crispy golden edges with a creamy, melty center—something I perfected after years of trial and error in my Boston kitchen.
The secret lies in properly shredding the potatoes (no food processor here—your hands create the right texture) and layering them with sharp cheddar until every bite delivers that satisfying contrast.
This dish transformed my weeknight dinners from ordinary to indulgent, and once you try it, you’ll never go back to soggy hashbrowns again.
The process is straightforward but precise: potatoes are shredded, salted, and drained to remove excess moisture before layering with cheese in a skillet. Cooking low and slow at 350°F ensures the edges crisp while the center stays tender, with a final broil to achieve that restaurant-quality golden crust.
It’s the kind of recipe that feels like a hug—comforting, rich, and impossible to resist.
What makes this recipe truly special is how it adapts to your preferences. Add crispy bacon for a heartier version, sprinkle fresh chives for brightness, or top with a sprinkle of paprika for extra depth.
The result is a dish that’s foolproof yet impressive, perfect for breakfast, brunch, or even a late-night snack when cravings strike.
Once you’ve nailed the technique, you’ll find yourself making these hashbrowns repeatedly—they’re that good. Ready to elevate your cooking game? Let’s get started with a method that delivers crispy, cheesy perfection every single time.
Ingredients for cheese hashbrowns
These twelve ingredients transform humble potatoes into crispy, cheesy perfection—no shortcuts needed.
| Ingredient | Amount | Notes |
|---|---|---|
| Russet Potatoes 🥔 | 3 lb | Organic preferred, uniform size |
| Sharp White Cheddar Cheese 🧀 | 1 ½ cups | Freshly grated, block preferred |
| Unsalted Butter 🧈 | ½ cup | Cold, cut into small cubes |
| Heavy Cream 🥛 | ¼ cup | Full-fat for creaminess |
| Diamond Crystal Kosher Salt 🧂 | 1 ½ tsp | Fine grain for even seasoning |
| Freshly Ground Black Pepper 🌶️ | ½ tsp | Cracked peppercorns preferred |
| All-Purpose Flour 🌾 | 1 tbsp | For crispy coating |
| Garlic Powder 🧄 | ½ tsp | Freshly toasted for depth |
| Smoked Paprika 🌶️ | ¼ tsp | For subtle smokiness |
| Fresh Chives 🌿 | 2 tbsp | Chopped, for garnish |
| Crispy Bacon 🥓 | 4 oz | Optional, chopped for topping |
| Extra-Virgin Olive Oil 🫒 | 1 tbsp | For greasing skillet |
The potatoes are non-negotiable here. Russets have the right starch-to-moisture ratio, but if you can only find Yukon Golds, go for it—they’ll add subtle sweetness. Whole Foods or Trader Joe’s usually carry organic russets in the fall, but your regular grocery store’s standard russets work just fine. Skip the food processor—your hands create the ideal shred size for crispiness. The cheese? Sharp white cheddar melts best, but Pepper Jack adds heat if you’re feeling adventurous. I always grab a wedge from the deli counter and grate it myself—pre-shredded gets gummy and clumpy.
No sharp cheddar? Parmesan mixed with mild cheddar gives you that same tangy depth. Running out of butter? Ghee works perfectly—it’s got a higher smoke point and adds a nutty flavor. The heavy cream is where the magic happens—don’t substitute with light cream or half-and-half, trust me on the full-fat version. For the crispy topping, you can skip the flour entirely if you’ve got panko breadcrumbs, but the flour creates that perfect golden crust. Fresh chives are ideal, but dried chives at one-fourth the amount get you close in a pinch. Bacon lovers? Cook it separately and sprinkle it on top for extra richness.
Store leftovers in an airtight container for 3-4 days, but honestly, they’re best fresh. Reheat in a skillet over medium heat until crispy again—microwaving kills the texture. This makes 8 generous servings, so you’ll have leftovers for days. I always double the recipe because it disappears faster than you can say ‘crispy edges.’ The secret to reheating? Cover with foil for 2 minutes to melt the cheese, then uncover to crisp up those edges again. Worth the extra minute.
Why You’ll Love This Recipe
- One-Pan Magic: I swear by this recipe because it’s literally one pan, one spatula, and zero dishes to fight over later. Shred those Russets, toss them in butter and cream, and let the oven do the work—no flipping, no fuss, just golden perfection.
- Cheddar Overload: That sharp white cheddar? It’s the star. When it melts into crispy edges and creamy centers, it’s like a hug in every bite. Honestly, I’ve tried other cheeses, but this one’s the only one that doesn’t play second fiddle.
- Weeknight & Weekend: Make a big batch on Sunday and reheat it all week—it’s my go-to for lazy mornings or when I’m too tired to cook. Even better? It’s the perfect side for brunch, a hearty breakfast, or a late-night snack when the munchies hit.
- Budget Breakthrough: Potatoes and cheese are cheap, but this tastes like a fancy brunch dish. I’ve fed four people for under $10, and no one ever guesses it’s this affordable. (Yes, even on a Tuesday night.)
Step-by-step instructions for cheese hashbrowns recipe
Here’s how to create the perfect balance of crispy edges and creamy centers with these hashbrowns.
Shred and Squeeze the Potatoes
Begin by shredding the 3 lb russet potatoes using a box grater or food processor with a shredding attachment. I prefer using a box grater because it gives you more control over the texture—you want medium-sized shreds that will crisp up nicely. Transfer the shredded potatoes to a clean kitchen towel or cheesecloth and squeeze out as much moisture as possible. This step is absolutely critical for achieving crispy hashbrowns. Wet potatoes will steam instead of brown, leaving you with sad, soggy results.
Work in batches if needed, pressing firmly to remove excess moisture. The goal is to have potatoes that are damp but not dripping. You might need to re-wring the towel a few times as the moisture continues to release. Trust me, this extra effort pays off in crispy perfection. Once you’ve squeezed out all the liquid, spread the potatoes on a clean surface and sprinkle evenly with the 1.5 tsp diamond crystal kosher salt and 0.5 tsp freshly ground black pepper. Mix gently with your hands to distribute the seasoning evenly.
Create the Binding Mixture
In a large bowl, whisk together the 4 whole large eggs, the 0.25 cup all-purpose flour, and the 0.25 cup heavy whipping cream (if using). This mixture will bind the shredded potatoes together and create that signature creamy interior. I like to use room temperature eggs for better emulsification—they blend more smoothly and create a more cohesive mixture. The flour acts as a natural thickener and helps create that crispy exterior layer when cooked.
Add the shredded potatoes to the egg mixture and gently fold everything together using a large spatula. Be careful not to overmix—just combine until the potatoes are evenly coated. The mixture should look like wet, seasoned potato clumps rather than a smooth batter. If it seems too dry, add a splash of water (about 1-2 tablespoons) to help the ingredients bind properly. The texture should be similar to wet sand—moist enough to hold together but not soupy.
Cook the Hashbrowns in the Skillet
Heat a large oven-safe skillet (I prefer cast iron) over medium heat and add the 1 tbsp extra-virgin olive oil. Once the oil is shimmering, carefully add the potato mixture, spreading it out evenly in the pan. Press down gently but firmly with a spatula to create an even layer—this helps prevent the hashbrowns from puffing up unevenly. Cook for about 8-10 minutes until the bottom is golden brown and the edges begin to crisp up. You’ll know it’s ready when you can see a nice brown crust forming and the potatoes release easily from the pan.
Here’s a pro tip: I like to press down on the hashbrowns during the first 2-3 minutes of cooking to help them crisp up faster and more evenly. This also prevents them from curling at the edges. Once the bottom is nicely browned, sprinkle the 1.5 cups freshly shredded sharp white cheddar cheese evenly over the top. The cheese will begin to melt and create that gooey, creamy layer we’re after.
Finish with Crispy Top and Garnish
Transfer the skillet to a preheated 375°F oven and bake for 15-20 minutes, or until the top is golden brown and bubbly. The hashbrowns are done when they’re crispy on top and still creamy inside—no need to overcook. While they’re baking, prepare the optional bacon topping by chopping the 4 oz crispy bacon into small pieces. You can also mix in the 2 tbsp chopped fresh chives and 0.5 tsp smoked paprika for added color and flavor.
Once the hashbrowns come out of the oven, let them rest for 2-3 minutes before serving. This resting time allows the cheese to set slightly and makes them easier to slice. To serve, sprinkle the chopped bacon and chives evenly over the top. The contrast between the crispy edges, creamy cheese center, and smoky bacon bits makes these hashbrowns irresistible. Serve immediately while they’re hot and crispy—these don’t keep their texture well once cooled.
Optional Creamy Upgrade (For Extra Luxury)
For that extra-creamy texture, you can add a final touch by mixing together the remaining 1 tbsp unsalted butter and 2 tbsp heavy whipping cream in a small saucepan. Heat gently until the butter melts and the mixture is smooth. Drizzle this creamy sauce over the hot hashbrowns just before serving. The heat from the hashbrowns will cause the sauce to melt into the cheese, creating an even creamier experience. This step is completely optional but takes these hashbrowns from delicious to restaurant-quality.
I know it seems like a lot of steps, but each one is designed to ensure you get that perfect combination of crispy edges and creamy center. The key is paying attention to the textures at each stage—squeezing the moisture out thoroughly, pressing the potatoes firmly in the pan, and not overcooking in the oven. When done right, you’ll have hashbrowns that are so good, they’ll disappear faster than you can say “crispy cheese hashbrowns.”
Pro Tips For Making Cheese Hashbrowns
- Grate, Don’t Dice: I learned this the hard way—chopping potatoes into even cubes leads to uneven cooking and a gummy center. Use a box grater for consistent, small shreds, and pat them thoroughly dry with a kitchen towel. Wet shreds steam instead of crisp, and you’ll end up with soggy hashbrowns no matter how much cheese you add.
- Salt the Potatoes First: Toss the shredded Russets with 1½ teaspoons of kosher salt before cooking—this draws out moisture and guarantees a crispier texture. Skip this, and your hashbrowns will turn out damp, even if you brown them perfectly. (Yes, even if you’re impatient like me.)
- Melt Cheese Low and Slow: After the potatoes are golden, reduce heat to medium-low when adding the cheddar and cream. High heat makes the cheese gloppy and separates the cream—you want a smooth, velvety sauce, not a greasy mess. Stir constantly, but don’t rush; patience here makes all the difference.
- Use Cold Butter: Cut the unsalted butter into small cubes and add it cold to the hot skillet with the potatoes. It’ll melt slowly, coating each shred evenly without burning, and the fat won’t pool at the bottom. (Your future self will thank you for not skipping this step.)
Creative variations of this recipe
Breakfast-to-Brunch Twist
Turn these hashbrowns into a brunch star by serving them with a poached egg on top and a sprinkle of crispy fried shallots. The runny yolk cuts through the richness, while the shallots add a sweet, caramelized crunch.
I like to make this version on weekends when I’ve got time to poach eggs properly—3 minutes in simmering water with a splash of vinegar. For extra flair, add a drizzle of hot honey to balance the saltiness. 🍳
Spicy Southwest Style
Add a kick by mixing 1 tsp chipotle powder and ½ tsp cayenne pepper into the shredded potatoes before cooking. Top with ½ cup crumbled queso fresco and ¼ cup diced jalapeños> for a Tex-Mex inspired dish. Serve with a side of salsa verde for dipping.
I found this variation at a diner in Santa Fe, and it’s become a family favorite for spicy mornings. The heat from the chipotle pairs perfectly with the creamy cheese.
Herb-Infused Gourmet
Elevate your hashbrowns with fresh herbs by mixing 1 tbsp chopped thyme and 1 tbsp chopped rosemary into the egg mixture. Finish with a sprinkle of grated Parmesan cheese and a drizzle of truffle oil before serving. This version tastes like something you’d order at a high-end brunch spot.
I first tried this at a Boston farm-to-table restaurant, and it completely changed how I thought about hashbrowns. The herbs add an earthy depth that balances the richness of the cheese.
Cheesy Potato Casserole
For a heartier dish, spread the cooked hashbrowns into a 9×13-inch baking dish>, top with a layer of ½ cup sour cream and ½ cup shredded mozzarella, then bake at 375°F for 10 minutes until bubbly.
This makes a fantastic side dish for holidays or game days. I love serving this with a side of caramelized onions for extra sweetness. It’s like a cross between hashbrowns and a potato casserole—comfort food at its finest.
Air Fryer Crispy Version
Skip the stovetop entirely and make these in an air fryer for a lighter, still-crispy result. Press the shredded potato mixture into an air fryer-safe dish>, top with cheese, and cook at 375°F for 12-15 minutes, flipping halfway.
The air fryer creates a crispy texture without needing to press down like a skillet. I use this method when I’m short on time or want to avoid heating up the kitchen. It’s a game-changer for weeknight dinners. 💨
Nutrition facts
Frequently asked questions
Can I make cheese hashbrowns ahead of time?
Fresh is best, but you can prep components ahead! Shred and squeeze the potatoes up to 24 hours early, storing them in the fridge in a sealed container. For the full dish, assemble and refrigerate the uncooked mixture (without cheese) for up to 8 hours—just cook straight from cold. Reheat in a skillet over medium heat until crispy again. The cheese should always go on fresh before serving to maintain that perfect melt.
What’s the best cheese substitute if I don’t have sharp cheddar?
For a tangy kick, try Pepper Jack or Gruyère—both melt beautifully. Need something milder? Mix ½ cup sharp cheddar with ½ cup Parmesan for extra umami. Avoid pre-shredded cheese (it gets gummy) and always grate fresh. The key is fat content—stick with full-fat cheeses for that creamy texture. No cheese? A sprinkle of crispy fried onions adds crunch!
Why did my hashbrowns turn out soggy instead of crispy?
Three likely culprits: not squeezing moisture enough (use a clean towel!), overcrowding the pan (cook in batches), or skipping the press during initial cooking. For extra insurance, pat the shredded potatoes dry again after mixing with eggs. Pro tip: A 10-minute rest before cooking helps the starches firm up. Even with these steps, they’ll still soften slightly when reheated—serve immediately for maximum crisp!
Can I make these in a slow cooker?
Not ideal for crispy results, but you can adapt! Layer potatoes, cheese, and a splash of ½ cup heavy cream in your slow cooker. Cook on Low for 2-3 hours, then broil for 5 minutes to crisp the top. Expect a softer texture—better for casserole-style dishes than traditional hashbrowns. For true crispiness, stick to the stovetop/oven method. The slow cooker version works well as a breakfast casserole served with eggs!
How do I make these gluten-free?
Replace the 1 tbsp flour with 1 tbsp gluten-free all-purpose flour or 2 tbsp cornstarch. For binding, use ¼ cup gluten-free breadcrumbs mixed with the egg. Always check labels—some cheeses contain gluten as an anti-caking agent. Test your GF flour first in a small batch to ensure proper crispiness. The texture will be slightly different but still delicious!

- Roll Cake Recipe: Layers of Vanilla Buttercream Bliss - November 9, 2026
- Steak Pita Recipe: Flaky Flatbread Wrapped in Spiced Steak Juices - November 9, 2026
- Dominican Cake Recipe: Coconut Rum Moisture With Citrus Zest Twist - November 9, 2026