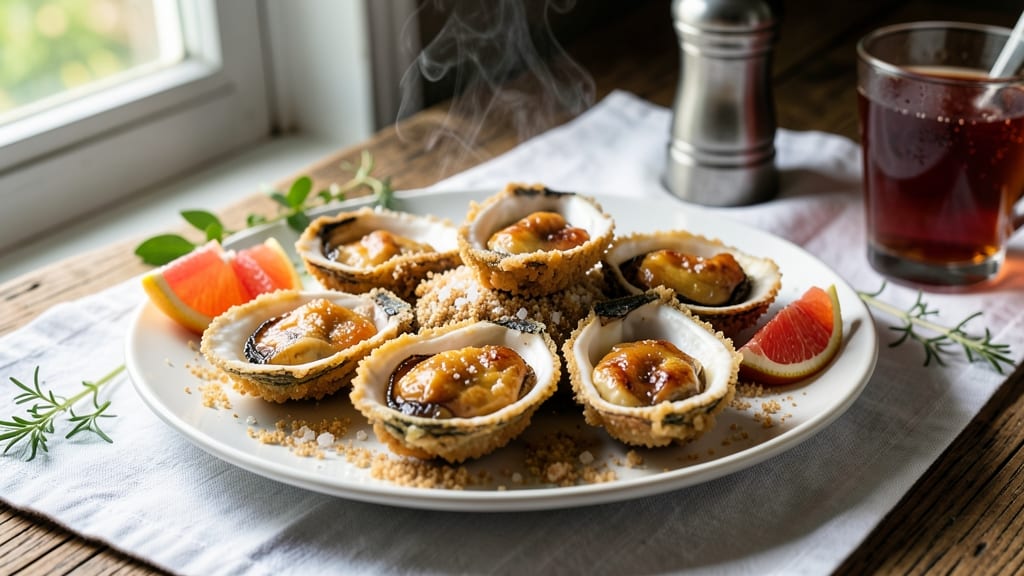
This buttermilk fried oysters recipe delivers the perfect balance of crispy gold shells and briny juices that make every bite unforgettable. Growing up in Boston, I learned that great fried oysters start with proper shucking and a well-seasoned batter—never rushed, always precise.
The secret lies in marinating the oysters in buttermilk for at least 30 minutes, ensuring they stay tender while the cornmeal crust achieves that coveted crispy texture.
What sets this recipe apart is the attention to detail that transforms a simple seafood dish into a restaurant-worthy experience. You’ll need fresh oysters, buttermilk, cornmeal, and a few basic spices—no shortcuts here.
The frying process requires patience: hot oil, careful dredging, and just enough time to create that golden crust without burning. I’ve tested this method countless times in my small Boston kitchen, and it never fails to impress.
The result is oysters with shells that shatter at the first bite, revealing tender, juicy meat still brimming with ocean flavor. The cornmeal batter adds a subtle crunch that contrasts beautifully with the creamy interior.
Serve them with a tangy remoulade or classic hushpuppies for the full Southern experience—this is comfort food at its finest.
This recipe also includes essential safety tips for handling raw oysters and frying, so you can enjoy the process without worry. Whether you’re cooking for a crowd or treating yourself to a special meal, these buttermilk fried oysters are guaranteed to become a favorite. Let’s get started!
Ingredients for buttermilk fried oysters
Four crispy bites of heaven—just oysters, buttermilk, and a golden cornmeal crust.
| Ingredient | Amount | Notes |
|---|---|---|
| Fresh Oysters 🦪 | 1 ½ lb | Shucked, liquid drained |
| Buttermilk 🥛 | 1 ½ cups | Full-fat, cold |
| Fine Cornmeal 🌾 | 1 cup | White or yellow |
| All-Purpose Flour 🌾 | ½ cup | Sifted for smooth batter |
| Granulated Sugar 🍚 | 1 tbsp | White, fine grain |
| Salt 🧂 | 1 tsp | Kosher or sea salt |
| Ground Black Pepper 🌶️ | ½ tsp | Freshly ground preferred |
| Cayenne Pepper 🔥 | ¼ tsp | Adjust for heat |
| Vegetable Oil 🫒 | 3 cups | High smoke point |
| Lemon Wedges 🍋 | 4 whole | For serving |
| Fresh Parsley 🌿 | ¼ cup | Chopped, for garnish |
Oysters are the star, so pick them fresh—look for plump shells that close tight when tapped. Local seafood markets or trusted fishmongers are your best bet; ask for them shucked the day of cooking. I always buy a pound extra (just in case) from Neptune Oyster or Local Catch in Boston—they keep them on ice until you’re ready. The cornmeal matters too: Bob’s Red Mill is my go-to for that perfect fine texture. Don’t skip the buttermilk—it’s what keeps the oysters tender while the crust gets crispy. Grab full-fat if you can; it makes all the difference.
No buttermilk? Substitute milk with 1 tbsp lemon juice or vinegar—let it sit 5 minutes to curdle. Short on cornmeal? Use half cornmeal, half all-purpose flour for a lighter crust, but you’ll lose that signature crunch. Fresh parsley wilting? Dried parsley works at one-third the amount, though it won’t look as pretty. The cayenne is optional, but trust me on the full-fat buttermilk—it’s worth the extra minute to whisk it smooth. And if your oil isn’t hot enough? The shells won’t crisp—use a thermometer and aim for 375°F.
Oysters stay fresh in the fridge for 2 days max—use them ASAP. The buttermilk batter keeps for 24 hours in the fridge, but it’s best same-day. For frying, 3 cups of oil is plenty—don’t skimp, or you’ll end up with soggy shells. Serve immediately with lemon wedges and parsley; they’re at their crispy best right out of the oil. Leftovers? Reheat in the oven at 350°F for 5 minutes—though honestly, they’re better fresh.
Why You’ll Love This Recipe
- No-Fuss Breading: The buttermilk dip and cornmeal coating are that easy—just toss, let sit, then fry. No rolling, no fussing, and honestly? The oysters do most of the work.
- Crispy-Creamy Magic: That sugar-kissed crust shatters like a dream, but the inside stays juicy—thanks to the buttermilk tenderizing them. It’s the kind of bite that makes you reach for another.
- Tailgate or Tuesday: Serve these with lemon wedges at a game or toss them in a basket for a lazy night. They’re equal parts party-worthy and “I’m too tired to cook” reliable.
- Budget-Friendly Luxury: Fresh oysters feel fancy, but the rest of the ingredients are pantry staples. One batch feeds four, and leftovers? Crispy perfection reheated in a skillet.
Step-by-step instructions for buttermilk fried oysters
Here’s how to create perfectly crispy fried oysters with a golden shell and tender interior.
Prepare the Oysters
Start with the 1.5 pounds of fresh oysters and shuck them carefully, ensuring you drain all the liquid. I like to place each oyster on its half-shell and gently pry open the top shell using a shucking knife—this keeps the meat intact. Once open, remove the oyster from its shell and place it on a plate. You want to work quickly here since fresh oysters are best used immediately.
Pat the oysters dry with paper towels to remove any excess moisture. This step is crucial because moisture on the oysters will prevent the batter from adhering properly, resulting in a less crispy coating. Arrange the oysters on a plate and let them sit at room temperature while you prepare the batter.
Make the Batter
In a medium bowl, whisk together the 1.5 cups of cold buttermilk, 0.5 cup of all-purpose flour, 1 tablespoon of granulated sugar, 1 teaspoon of salt, 0.5 teaspoon of ground black pepper, and 0.25 teaspoon of cayenne pepper. The buttermilk should be full-fat and cold to ensure the best texture. Mix until the batter is smooth and free of lumps—this means the flour is fully incorporated and the batter has a creamy consistency.
Let the batter rest for 10-15 minutes at room temperature. This resting period allows the flour to fully hydrate and the batter to thicken slightly, which helps create a better crust on the oysters. If you skip this step, the batter might be too thin and result in a soggy coating.
Heat the Oil
Fill a deep skillet or Dutch oven with 3 cups of vegetable oil and heat it over medium-high heat until it reaches 350°F. Use a deep-fry thermometer to monitor the temperature—this is critical for achieving that perfect crispy texture. If the oil isn’t hot enough, the oysters will absorb too much oil and turn greasy instead of crispy.
Once the oil reaches 350°F, it should shimmer slightly but not smoke excessively. This is the ideal temperature for frying the oysters. Keep the oil heated and ready while you prepare the oysters for frying. Having the oil at the right temperature ensures a quick fry and a golden, crispy shell.
Fry the Oysters
Working in batches to avoid overcrowding the pan, dip each oyster into the batter, letting any excess drip off. Gently lower the oysters into the hot oil using a slotted spoon or tongs. Fry for 2-3 minutes per side until they turn a deep golden brown color. You’ll see the batter bubble and crisp up as it hits the oil—this is your signal that it’s working.
Don’t overcrowd the pan, or the oil temperature will drop, leading to greasy oysters instead of crispy ones. Use a slotted spoon to carefully remove the oysters from the oil and place them on a paper towel-lined plate to drain any excess oil. Keep them warm in a 200°F oven while you fry the remaining batches.
Serve Immediately
Once all the oysters are fried, transfer them to a serving platter. Garnish with the 4 whole lemon wedges and 0.25 cup of chopped fresh parsley for a pop of color and freshness. Serve the oysters immediately while they’re still crispy and hot. The lemon wedges add a bright, tangy contrast to the rich, briny flavor of the oysters.
For the best experience, serve these fried oysters with a side of cocktail sauce or a simple tartar sauce. The crispy shells should hold up well, and the tender oyster meat inside should be juicy and flavorful. Enjoy them right away—they’re best when served hot and crispy!
Pro Tips For Making Buttermilk Fried Oysters
- Dry the Oysters First: Pat them thoroughly with paper towels—wet shells mean soggy batter. I learned this the hard way when my first batch turned out like dumplings instead of crispy bites. A quick 5-minute air-dry on a wire rack helps too, if you’re impatient like me.
- Use Warm Buttermilk: Toss the oysters in buttermilk that’s just barely warm—room temp works, but a splash of hot water (not boiling) makes the coating cling better. Cold buttermilk feels like fighting with glue. Trust me, your crust will thank you.
- Double-Dip the Cornmeal: Toss the oysters in flour first, shake off the excess, then dip again in buttermilk, and finally roll in cornmeal. The extra layer keeps the coating from sliding off mid-fry. Yes, it’s messy—no, you can’t skip it.
- Keep Oil at 350°F: Too hot, and the outside burns before the inside cooks. Too cool, and you’re left with a greasy, uncrispy mess. A candy thermometer is worth the $10—your first batch will be perfect, I promise.
Pro cooking tips for buttermilk fried oysters
Buttermilk Marinade Magic
The 30-minute buttermilk marinade is non-negotiable for tender oysters. I learned this the hard way—once I skipped it and ended up with tough, rubbery bites. The acid in buttermilk gently cooks the oysters’ proteins, keeping them juicy while the cornmeal crust forms.
For best results, use full-fat buttermilk straight from the fridge—it’s richer and creates a smoother batter. Let the oysters sit in the marinade uncovered in the fridge for 30-60 minutes so they absorb flavor without getting waterlogged. 🥛
Cornmeal Crust Secrets
Don’t substitute cornmeal with flour—it’s the secret to that signature Southern crunch. I use Bob’s Red Mill fine cornmeal because it’s finely ground enough to stick to the oysters without clumping. The key is to mix your dry ingredients first (flour, sugar, spices) before adding buttermilk.
This creates a smoother batter that coats the oysters evenly. For extra crispiness, I like to add 1 tablespoon of cornstarch to the dry mix—it helps create that perfect shatter. 🌾
Oil Temperature Control
This is where most home cooks mess up. Your oil needs to be exactly 350°F—any lower and you’ll get greasy oysters, any higher and they’ll burn before cooking through. I use a ThermoWorks Smoke thermometer because it’s precise and hangs easily over my skillet.
Test the temperature by dropping in a pinch of batter—if it sizzles and floats immediately, you’re good to go. Keep the oil hot between batches by adjusting the burner as needed. 🌡️
Frying Technique
Working in batches of 4-5 oysters is crucial—overcrowding drops the oil temperature and makes the shells soggy. I use a slotted spoon to lower them gently into the oil, holding them at a slight angle so the batter doesn’t drip off.
Fry for 2-3 minutes per side until golden brown, then drain on a wire rack (not paper towels)—this keeps them crispy longer. The first batch will teach you the perfect timing for subsequent batches. ⏱️
Shell Shattering Test
Here’s my foolproof way to know they’re perfect: pick up an oyster and give the shell a gentle squeeze. If it shatters with a satisfying crack, you’ve nailed the texture. If it bends or stays intact, your oil wasn’t hot enough or your frying time was too short.
I’ve found that letting the oysters rest 2 minutes after frying helps the crust set before serving. This is especially important if you’re making them ahead for a crowd. 💫
Safety First
Never leave hot oil unattended—it’s a fire hazard, especially with cornmeal which burns quickly. Keep a fire extinguisher nearby and never throw water on a grease fire. I also recommend wearing heat-resistant gloves when handling hot oysters.
And remember, raw oysters can be risky—stick to freshly shucked ones from reputable sources. The 30-minute marinade in buttermilk also helps reduce bacteria, but it’s not a substitute for proper handling. 🔥
Nutrition facts
Frequently asked questions
Can I use frozen oysters for this recipe?
Fresh is best for fried oysters, but if you must use frozen, thaw them overnight in the fridge first. Drain thoroughly and pat completely dry before marinating—the extra moisture will make the batter clump. For best results, buy fresh oysters shucked the same day from a trusted seafood market.
What’s the best way to store leftover fried oysters?
Keep them crispy by storing in a single layer on a wire rack in the fridge for up to 2 days. Reheat in a 350°F oven for 5-7 minutes—never microwave, or they’ll turn soggy. For longer storage, freeze them on a tray first, then transfer to a bag. Thaw in the fridge before reheating.
Why did my oysters turn out greasy instead of crispy?
Most likely your oil wasn’t hot enough (350°F) or you overcrowded the pan. Use a thermometer to check temperature and fry in batches of 4-5 oysters. Also ensure you patted the oysters completely dry before dredging—they should be bone-dry to prevent oil absorption.
Can I make the batter ahead of time?
Yes, but it’s best used within 24 hours for optimal texture. Store in an airtight container in the fridge—stir well before using and let it sit at room temperature for 10 minutes to thicken slightly. For longer storage, freeze the dry ingredients separately and mix with buttermilk when ready.
What are the best sides to serve with fried oysters?
Classic Southern pairings include creamy hushpuppies, tangy remoulade sauce, or a crisp green salad with lemon vinaigrette. For a lighter option, try roasted corn on the cob or steamed broccoli with garlic butter. The key is balancing the richness of fried oysters with something bright and refreshing.

- Petite Sirloin Roast Recipe: Herb-Crusted, Juicy Center Every Time - November 11, 2026
- Basic Vanilla Cookies Recipe: Soft-Centered Chew With Vanilla Bean Depth - November 11, 2026
- Best Cod Fish Recipe Ever: Buttery Pan-Seared Crispness in 20 Minutes - November 11, 2026