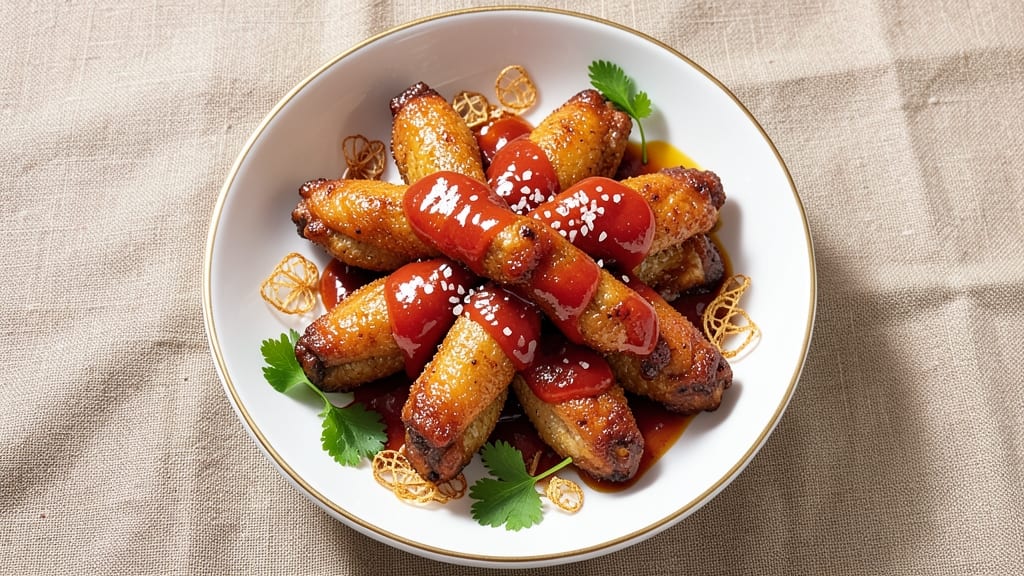
This baked sweet and sour chicken wings recipe delivers restaurant-quality flavor without the mess of deep-frying, combining crispy edges with a glossy, caramelized glaze that balances sweet and tangy perfectly.
The secret lies in marinating the wings overnight to ensure deep flavor penetration, followed by a baking technique that locks in moisture while creating that coveted crunch. I developed this method after years of experimenting with air fryer and oven techniques—this version consistently delivers the best of both worlds.
The recipe begins with a simple yet effective marinade of soy sauce, honey, and a blend of spices that tenderizes the chicken while adding depth.
The sweet and sour glaze, made with just five ingredients, is the star—it caramelizes beautifully in the oven, creating a sticky, glossy finish that clings to every wing.
What sets this apart is the balance: the glaze isn’t overly sweet or sour, but harmoniously both, with a touch of spice for complexity. The wings emerge golden brown, crispy on the outside, and juicy inside, ready to be served with your favorite dipping sauce.
This method is designed for foolproof results, even for beginners. No deep-frying means less cleanup, and the oven does all the work while you prep the glaze.
The recipe serves four and takes just 45 minutes from start to finish, making it perfect for game day, weekend dinners, or whenever you crave wings without the hassle. The glaze can be adjusted to suit your sweetness preference—just tweak the honey-to-vinegar ratio—and the wings stay crispy even when reheated.
Every bite is a perfect marriage of textures and flavors.
Serve these wings with a side of celery and carrot sticks, extra glaze for drizzling, or a cooling ranch dip to balance the heat. The leftovers reheat beautifully, making this a great meal-prep option for busy weeks.
Whether you’re feeding a crowd or treating yourself to a crispy, saucy indulgence, this recipe delivers restaurant-quality wings with minimal effort. Let’s get cooking!
Ingredients for baked sweet and sour chicken wings
Game day wings without the fryer mess—just crispy edges and sticky, caramelized glaze.
| Ingredient | Amount | Notes |
|---|---|---|
| Chicken Wings 🍗 | 2 lb | Bone-in, skin-on, split into drumettes |
| Soy Sauce 🍶 | ½ cup | Low-sodium preferred for balance |
| Honey 🍯 | ⅓ cup | Pure, liquid honey for smooth glaze |
| Rice Vinegar 🍶 | ⅓ cup | White or seasoned for tang |
| Brown Sugar 🍚 | ¼ cup | Packed, light or dark variety |
| Garlic Cloves 🧄 | 4 cloves | Minced, fresh for bold flavor |
| Ginger Root 🌿 | 1 tbsp | Freshly grated, aromatic |
| Sesame Oil 🫒 | 1 tbsp | Toasted, for nutty aroma |
| Cornstarch 🌾 | 2 tbsp | For crispy glaze texture |
| Vegetable Oil 🫒 | 2 tbsp | For tossing wings |
| Salt 🧂 | 1 tsp | Kosher or sea salt |
| Black Pepper 🌶️ | ½ tsp | Freshly ground for heat |
| Red Pepper Flakes 🔥 | ½ tsp | Optional, for subtle heat |
| Green Onion 🧅 | 2 whole | Thinly sliced, for garnish |
The chicken wings are everything here—bone-in, skin-on for maximum flavor and crunch. Costco or Trader Joe’s usually have the best deals on bulk wings, but any grocery store will do. Look for wings that are plump and slightly glossy, not dried out. If you can’t find them pre-split, just snap them apart yourself—it takes two seconds. The skin-on variety crisps up beautifully in the oven, giving you that restaurant-quality texture without deep-frying. And trust me, splitting them into drumettes makes them easier to toss in the marinade and glaze later.
No soy sauce? Coconut aminos works in a pinch, though it’s got a slightly different profile. The honey-to-vinegar ratio is key—if you prefer sweeter wings, bump up the honey to 0.4 cup and reduce vinegar to 0.25 cup. Fresh ginger and garlic are non-negotiable for that bold, aromatic kick, but if you’re in a bind, dried ginger at half the amount and jarred minced garlic will work. The sesame oil adds depth, but if you’re avoiding it, toasted sesame seeds sprinkled on top at the end give a similar nutty vibe. And for the glaze? Substitute maple syrup for honey if you’re avoiding refined sugar—just add a splash of water to thin it out.
Marinate the wings overnight for maximum flavor penetration, but if you’re short on time, at least 2 hours will do. The glaze can be prepped ahead and stored in the fridge for up to 3 days—just reheat it gently before using. Leftovers? Reheat at 375°F for 8-10 minutes to restore that crispy texture. These wings freeze beautifully too—portion them out before freezing so you can grab just what you need. And pro tip: Save the leftover glaze in a jar—it’s perfect for drizzling over rice or noodles later.
Why You’ll Love This Recipe
- No-Fuss Glaze: I swear by this marinade—just toss the wings in soy sauce, honey, and brown sugar, then let the oven do the work. No blender, no straining, no mess.
- Sweet-Savory Magic: That tangy kick from rice vinegar? It’s the secret weapon. The honey caramelizes into a sticky, addictive glaze while the soy keeps it rich—crispy outside, juicy inside.
- Game for Any Gathering: Serve them as a snack platter, toss them into a rice bowl, or pile them high on a sandwich. Honestly, I’ve even used leftover wings in fried rice—zero waste, all flavor.
- Budget-Friendly Feast: A pound of wings and pantry staples cost me less than takeout, but the taste? Way better. Plus, the leftovers reheat like a dream—crispy edges intact.
Step-by-step instructions for baked sweet and sour chicken wings
Here’s how to achieve that perfect balance of sticky-sweet glaze and crispy edges without deep-frying.
Marinate the Wings for Maximum Flavor
In a large bowl, combine the 2 lb chicken wings with the 0.5 cup soy sauce, 0.33 cup rice vinegar, 0.25 cup brown sugar, 1 tbsp sesame oil, 1 tsp salt, 0.5 tsp black pepper, and 0.5 tsp red pepper flakes. This marinade works its magic immediately—don’t skip this step. Toss everything together until every wing is thoroughly coated, then let it sit at room temperature for 15 minutes while you prep the oven.
I like to press the marinade into the meat with my hands, especially around the drumettes where flavor tends to pool. The acid in the rice vinegar starts breaking down the proteins now, ensuring tender wings later. If you’re short on time, you can marinate for 30 minutes in the fridge, but room temperature works best for this quick method.
Create the Glossy Sweet and Sour Sauce
While the wings marinate, make the sauce by combining the 0.33 cup honey, 4 cloves minced garlic, 1 tbsp freshly grated ginger root, and 2 tbsp cornstarch in a medium bowl. Whisk until the cornstarch dissolves completely—this prevents lumps that can make your sauce grainy. The sauce should look smooth and slightly thick, like liquid honey.
In a separate small bowl, mix the 2 tbsp vegetable oil with 1 tbsp of the marinade from the wings. This oil mixture helps create that beautiful caramelized crust during baking. Keep both mixtures nearby—you’ll need them in the next step.
Bake to Crispy Perfection
Preheat your oven to 425°F. Line two baking sheets with parchment paper and arrange the marinated wings in a single layer, leaving about 1 inch between each piece. This spacing prevents steaming and ensures crispy edges. Drizzle the oil-marinade mixture evenly over the wings, then bake for 25 minutes, flipping halfway through.
After 25 minutes, the wings should be golden brown and the skin should be crisping. This is when you’ll add the sauce—remove the wings from the oven and transfer them to a large bowl. Pour the honey-garlic-ginger mixture over the wings, tossing gently to coat. Return them to the baking sheets and bake for another 10-15 minutes until the sauce is thick and glossy.
Finish with Crispy Edges and Garnish
Watch the wings closely during the final 5 minutes—they’ll develop that perfect caramelized crust when the edges turn deep golden brown. The sauce should be thick enough to coat the back of a spoon but still glossy, not sticky. If it’s too thin, return the wings to the oven for another minute or two to reduce the sauce.
Remove the wings from the oven and immediately garnish with thinly sliced green onion. Let them rest for 2 minutes before serving—this gives the juices a chance to redistribute. Serve with extra sauce on the side for dipping, and watch as everyone reaches for seconds. The contrast of crispy skin, tender meat, and that perfect sweet-sour glaze makes these wings unforgettable!
Pro Tips For Making Baked Sweet And Sour Chicken Wings
- Prep Wings Like a Pro: Pat them bone-dry with paper towels before baking—this isn’t just about crispiness, it’s about the glaze sticking. I learned this after my first batch turned soggy; the sauce just slid off like it was on a greased slide.
- Bake in Two Stages: Start at 425°F for 15 minutes to render fat and sear, then drop to 375°F for the rest. After burning three batches at high heat, I finally realized the wings need time to cook through without turning into charcoal.
- Reduce the Sauce First: Simmer your honey, soy, vinegar, and brown sugar mix until it thickens slightly—about 3-4 minutes. This keeps the wings from swimming in syrup and guarantees a sticky, caramelized crust instead of a sticky mess.
- Toss Wings in Hot Sauce: Toss the wings in the reduced sauce while they’re still hot from the oven. The residual heat helps the glaze cling instantly—no waiting for it to cool and turn runny. (Yes, even if you’re impatient like me.)
Troubleshooting this dish
Glaze Too Thin?
If your sauce ends up watery after baking, it’s likely because the cornstarch didn’t thicken properly. I’ve found that whisking the sauce vigorously over medium heat for 2-3 minutes before tossing it on the wings helps activate the cornstarch.
For an extra boost, add 1 tsp more cornstarch and mix it into the sauce while it’s still warm. If you’re baking and notice the glaze pooling, return the wings to the oven for 1-2 minutes to reduce it further. 💡
Wings Not Crispy?
The key to crispy wings is proper airflow and high heat. Make sure your oven is fully preheated to 425°F before baking—cold spots can lead to soggy skin. Arrange wings in a single layer with 1 inch between each to prevent steaming.
If your oven runs hot, reduce the temp to 400°F and bake for 5-10 minutes longer. For extra crunch, broil the wings for 1-2 minutes at the very end, watching closely to avoid burning. 🔥
Glaze Too Sweet?
If your wings taste overwhelmingly sweet, the honey-to-vinegar ratio is likely off balance. For a tangier finish, increase the rice vinegar to 0.4 cup and reduce honey to 0.25 cup.
Alternatively, add 1 tbsp more fresh ginger or ½ tsp red pepper flakes to cut through the sweetness with brightness and heat. Taste the sauce before baking—it should have a slightly sweet, slightly tangy flavor, not cloying. 🌶️
Sauce Not Sticking?
A glossy, sticky glaze requires tossing the wings gently but thoroughly after adding the sauce. If it’s not clinging, the sauce might be too thin or the wings too dry. For a better grip, brush the wings with a light layer of vegetable oil before tossing them in the sauce.
Another trick? Add 1 tbsp of the marinade to the sauce—it contains soy sauce and sesame oil, which help the glaze adhere. 💪
Wings Overcooked?
Overcooked wings happen when they spend too long in the oven, especially after adding the sauce. To prevent this, bake the wings for 20 minutes before adding the sauce, then finish with 8-10 minutes at most. Use a meat thermometer to check the internal temp—165°F is perfect.
If they’re drying out, reduce the baking time by 2-3 minutes and cover them loosely with foil for the last 5 minutes to retain moisture. ⏱️
Glaze Too Thick?
If your sauce is too thick and clumpy, it’s likely because the cornstarch wasn’t dissolved properly. Thin it out with 1-2 tbsp of warm water or rice vinegar while whisking. For a smoother texture, strain the sauce through a fine-mesh sieve before tossing it on the wings.
If the glaze is too thick after baking, reheat it gently in a small saucepan with 1 tbsp water to loosen it up. 🍯
Nutrition facts
Frequently asked questions
Can I make these wings ahead of time?
The marinade can be prepped up to 24 hours in advance, and the glaze keeps well in the fridge for 3 days. For best results, bake the wings fresh, but you can reheat them at 375°F for 8-10 minutes to restore crispiness. Store cooked wings in an airtight container with parchment paper between layers to prevent sticking.
What’s the best way to adjust the sweetness level?
Start by tasting the sauce before baking—it should balance sweet and tangy. For less sweetness, reduce honey to 0.25 cup and add 1 tbsp extra rice vinegar. For more sweetness, increase honey to 0.4 cup but keep vinegar at 0.33 cup to avoid cloying flavors. Fresh ginger or red pepper flakes also help balance sweetness with brightness.
Can I use boneless wings for this recipe?
Boneless wings will work, but expect a different texture—they’ll be more tender and less crispy. For best results, pat them dry thoroughly and bake at 400°F for 15-20 minutes before adding the glaze. The skin-on, bone-in wings in this recipe create that signature crunch, but boneless works in a pinch!
How do I prevent the glaze from burning?
Watch the wings closely during the final 5 minutes of baking—the glaze burns faster than the chicken. If it darkens too quickly, reduce the oven to 375°F and bake for 2-3 minutes longer. For extra insurance, brush the glaze on just before the last 5 minutes of baking. A light broil at the end can add color without burning.
What’s the secret to extra-crispy wings?
Pat the wings very dry before baking, and arrange them in a single layer with 1 inch between each. Bake at 425°F for 25 minutes before adding the glaze, then finish with 10 minutes at 400°F to caramelize the sauce without overcooking. For bonus crunch, broil for 1-2 minutes at the very end.

- Basic Vanilla Cookies Recipe: Soft-Centered Chew With Vanilla Bean Depth - November 11, 2026
- Best Cod Fish Recipe Ever: Buttery Pan-Seared Crispness in 20 Minutes - November 11, 2026
- Liver and Onions Recipe: Pan-Sear Perfection With Caramelized Depth - November 11, 2026