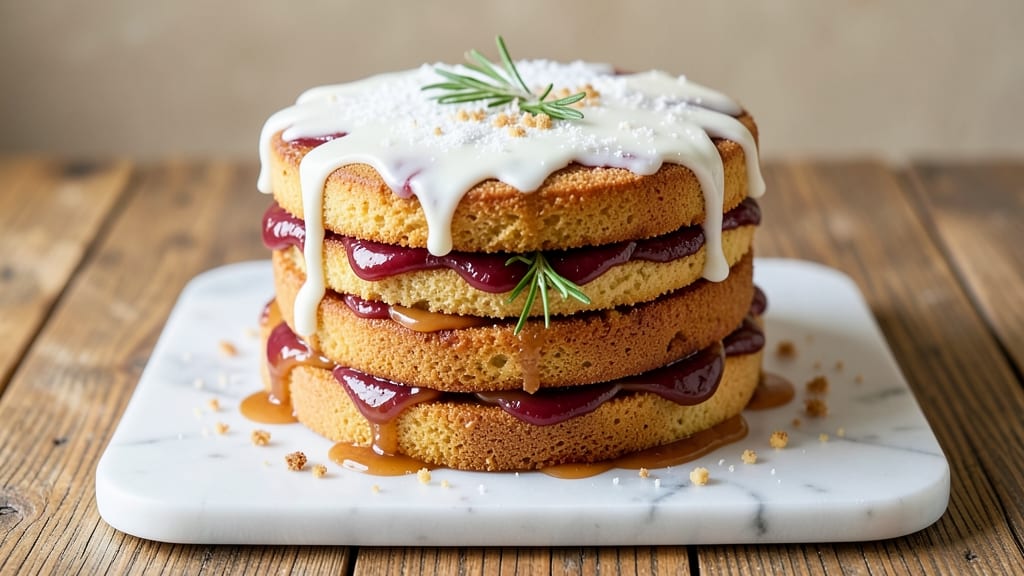
This applesauce stack cake delivers the perfect balance of spiced moistness and velvety vanilla buttercream—each layer tender yet sturdy enough to hold its shape. After years of perfecting the ratio of applesauce to flour, I’ve developed a foolproof method that ensures rich, flavorful layers without drying out.
The secret lies in baking time and temperature control, which keeps the cake perfectly moist while allowing it to set just enough for stacking.
The cake itself is a symphony of warm spices—cinnamon, nutmeg, and a hint of allspice—that complement the natural sweetness of the applesauce.
Unlike traditional cakes, this one relies on the moisture from the applesauce to create a tender crumb, while the buttercream adds a smooth, sweet contrast that ties everything together. Every slice offers a harmonious blend of texture and flavor, making it ideal for celebrations or cozy afternoons.
What makes this recipe truly special is its versatility—it’s easy to adapt for dietary preferences while maintaining its signature moistness. The layers are sturdy enough to support generous buttercream filling, yet delicate enough to melt in your mouth.
Whether you’re serving it at a birthday party or enjoying a quiet dessert at home, this cake delivers restaurant-quality results with minimal effort.
Ready in just 90 minutes (including cooling time), this applesauce stack cake is perfect for bakers of all skill levels. The step-by-step instructions ensure you’ll achieve perfectly even layers and smooth frosting every time. Let’s get baking!
Ingredients for applesauce stack cake
Twelve ingredients for twelve perfect layers—spiced, moist, and stacked to impress.
| Ingredient | Amount | Notes |
|---|---|---|
| Unsalted Butter 🧈 | 1 cup | Room temperature for creaming |
| Granulated Sugar 🍚 | 2 cups | White or light brown preferred |
| Unsweetened Applesauce 🍎 | 1 cup | Unflavored, unsweetened variety |
| Large Eggs 🥚 | 2 whole | Room temperature for best mixing |
| Vanilla Extract 🌸 | 2 tsp | Pure vanilla extract preferred |
| All-Purpose Flour 🌾 | 2 ½ cups | Sifted for even texture |
| Baking Powder 🍞 | 2 tsp | Freshly opened for best rise |
| Ground Cinnamon 🌶️ | 2 tsp | True cinnamon, not cassia |
| Ground Nutmeg 🌿 | ½ tsp | Freshly grated preferred |
| Ground Allspice 🌶️ | ½ tsp | For warm spice complexity |
| Salt 🧂 | ½ tsp | Fine sea salt preferred |
| Vanilla Buttercream Frosting 🍰 | 3 cups | Homemade or quality store-bought |
| Powdered Sugar 🍚 | 2 cups | For buttercream if making from scratch |
The applesauce is the star here, so grab the unsweetened, unflavored kind—none of that cinnamon-apple stuff. Mott’s or Libby’s work great, but check the label for added sugar. The butter needs to be unsalted and room temperature—this isn’t the time for cold, lumpy butter. For the spices, Penzeys or local spice shops carry true cinnamon (not cassia), which makes all the difference. If you’re making the buttercream from scratch, use European-style powdered sugar—it’s finer and dissolves better than the domestic kind. And don’t skimp on the vanilla extract—Madagascar Bourbon adds depth that imitation can’t match.
No applesauce? Unsweetened applesauce purée from fresh apples works perfectly—just blend peeled, cored apples until smooth. Running short on vanilla extract? Vanilla bean paste at half the amount gives you those little specks of magic. The buttercream can be store-bought (like Betty Crocker or Duncan Hines), but homemade is worth it—just mix softened butter, powdered sugar, vanilla, and a splash of milk until fluffy. For a dietary tweak, swap the buttercream for cream cheese frosting—it’s tangier and pairs beautifully with the spiced cake. And if you’re baking for a crowd, make the cake mix ahead and refrigerate it overnight—it develops even better flavor.
The cake keeps well at room temperature for 3 days, wrapped tightly in plastic. For longer storage, freeze the stacked cake (with frosting) for up to 3 months. Thaw overnight in the fridge before serving. The frosting? Store it in an airtight container in the fridge for 1 week—just bring it to room temp and re-whip before using. Pro tip: Make the buttercream a day ahead—it tastes even better after resting. And if you’re prepping for a party, assemble the cake layers the night before and refrigerate—it’ll hold together perfectly when you frost it the next day.
Why You’ll Love This Recipe
- Here’s what sold me: the applesauce keeps it tender for days, but the butter and sugar still make it rich. It’s like a lighter, fruitier pound cake—no one will believe you swapped half the fat for applesauce. (Yes, even on a Tuesday night.)
- No Mixer Needed: I’ll be real—this cake comes together with a wooden spoon and a bowl. Cream butter and sugar until fluffy, fold in eggs one at a time, then stir in applesauce until just combined. That’s it. No electric mixer, no overmixing, just pure simplicity.
- Moist Without the Guilt: Here’s what sold me: the applesauce keeps it tender for days, but the butter and sugar still make it rich. It’s like a lighter, fruitier pound cake—no one will believe you swapped half the fat for applesauce. (Yes, even on a Tuesday night.)
- Layered Like a Pro: Stack it, frost it, or serve it plain—this cake plays well with others. Make it ahead for potlucks, slice it for breakfast toast, or crumble it into oatmeal. The applesauce base means it holds up to whatever you throw at it.
Step-by-step instructions for applesauce stack cake
Here’s how to build layers of spiced moistness with perfect texture and structure.
Cream Butter and Sugars to Lighten the Batter
In a stand mixer fitted with the paddle attachment, beat the 1 cup unsalted butter and 2 cups granulated sugar on medium speed for 3-4 minutes until light and fluffy. You’re looking for a texture that nearly doubles in volume and leaves pale ribbons when you lift the paddle. This step incorporates air, which creates that tender crumb we want in each layer.
Don’t rush this process—the butter should be completely smooth with no graininess. If you press the mixture between your fingers, it should hold its shape briefly before melting away. This ensures your cake will be light rather than dense. I like to add the vanilla extract during this stage so it fully emulsifies into the butter-sugar mixture.
Alternate Adding Applesauce and Eggs
With the mixer running on low speed, add the 1 cup unsweetened applesauce in a slow stream, mixing just until combined. This keeps the batter from becoming too thick. After the applesauce is fully incorporated, add the 2 whole large eggs one at a time, mixing on low speed for 30 seconds after each addition.
The applesauce serves as both a moisture source and a natural tenderizer in this recipe. It replaces some of the butter’s fat while keeping the cake incredibly moist. The eggs provide structure, and adding them one at a time prevents the batter from becoming too runny or curdling. You’ll notice the mixture becomes smoother and more cohesive as you work.
Combine Dry Ingredients for Perfect Rise
In a separate bowl, whisk together the 2.5 cups all-purpose flour, 2 teaspoons baking powder, 2 teaspoons ground cinnamon, 0.5 teaspoon ground nutmeg, 0.5 teaspoon ground allspice, and 0.5 teaspoon salt. Sift the dry ingredients directly into the wet mixture with the mixer on low speed, mixing just until combined—about 20-30 seconds total.
Overmixing develops gluten, which can make your cake tough. You should still see small flour streaks when you’re done. The warm spices—especially cinnamon and nutmeg—will give your cake that signature applesauce cake flavor. The baking powder provides the lift we need for those tall, even layers. Stop mixing as soon as everything comes together.
Bake Three Even Layers for Perfect Stacking
Preheat your oven to 350°F and divide the batter evenly among three 6-inch round cake pans lined with parchment paper. Bake for 25-30 minutes, or until a toothpick inserted into the center comes out clean. The edges should be golden brown, but the tops might look slightly underbaked—they’ll firm up as they cool.
I rotate the pans halfway through baking for even browning. Let the cakes cool in their pans for 10 minutes, then transfer to a wire rack to cool completely. This cooling step is crucial—warm cakes will be too soft to stack properly. The applesauce keeps them moist while the spices infuse throughout each layer.
Assemble with Vanilla Buttercream for Decadent Layers
Once completely cool, level the tops of the cakes if needed. Place the first layer on a cake stand or plate and spread 1 cup of the 3 cups vanilla buttercream frosting evenly over the top. Repeat with the second layer, then the third. For extra height, you can add a thin layer of frosting between each cake layer.
Crumb coat the entire cake with the remaining 2 cups frosting, then chill for 15 minutes. This helps the frosting set before the final decoration. For the final coat, use the 2 cups powdered sugar in your buttercream recipe if making it from scratch—this gives that classic smooth finish. The contrast between the spiced cake layers and creamy vanilla frosting makes this stack truly special.
Pro Tips For Making Applesauce Stack Cake
- Cream Butter Slowly: If you dump cold butter into hot sugar and eggs, you’ll end up with lumps that never dissolve. Use a stand mixer (or hand mixer) and let that butter soften first—about 5 minutes at room temperature—then add it in small chunks while mixing on low. I learned this the hard way when my first batch turned into a grainy, sad mess.
- Use Warm Applesauce: Cold applesauce makes the batter thick and heavy. Warm it up slightly (just until it’s no longer icy to the touch) before mixing it into the wet ingredients. This keeps the texture light and fluffy—like the difference between a dense brick and a cloud. Trust me, your cake layers will thank you.
- Don’t Overmix the Batter: Once you fold in the dry ingredients, stop mixing the second everything is just combined. Overmixing develops gluten, and your cake will turn out tough instead of tender. Give it two quick stirs with a spatula—no need to go full marathon mode. I used to think more mixing = better cake, but that’s how you end up with a chewy, sad stack.
- Bake in Two Stages: Start your cake layers at 350°F (175°C) for 15 minutes, then drop the heat to 325°F (165°C) until a toothpick comes out clean. The high heat gets them rising fast, while the lower temp prevents overbrowning. I was skeptical until I tried it—now my cakes bake evenly without burning on the outside before they’re done inside.
Wine and beer pairings for this dish
Spiced Apple Wine
An American-style spiced apple wine like Hard Cider from Angry Orchard or Woodchuck Hard Cider complements this cake beautifully. The crisp acidity and subtle apple notes mirror the cake’s natural flavors while cutting through the richness of the buttercream. Serve slightly chilled for an elegant touch—around 45-50°F. 🍎
Warm Spiced Chardonnay
For a cozy dessert pairing, try a warm Chardonnay with a hint of cinnamon and clove. I recommend Kim Crawford Chardonnay from New Zealand—its buttery texture and citrus notes harmonize with the cake’s warm spices.
Heat the wine gently in a saucepan with a cinnamon stick and 1 star anise pod until steaming (don’t boil). The aroma alone enhances the cake’s spiced profile. 🍷
Caramel Apple Beer
A caramel apple ale like Samuel Adams Utopias or Allagash Curieux adds a fun, festive contrast. The caramel sweetness echoes the applesauce, while the beer’s effervescence cleanses your palate between bites. For extra flair, rim your glass with a mix of powdered sugar and cinnamon before pouring. 🍺
Creamy Vanilla Port
For a luxurious finish, pair with a tawny Port like Graham’s 10-Year-Old. The nutty, caramelized notes of the Port enhance the cake’s vanilla buttercream and warm spices.
Serve at room temperature—about 65°F)—to let the flavors meld. A small glass (2-3 ounces) is perfect for balancing the cake’s richness without overpowering it. 🍷
Apple Cider Mocktail
For a non-alcoholic option, blend 1 cup apple cider, ½ cup ginger ale, and a splash of vanilla syrup. Garnish with a cinnamon stick and serve over ice.
The effervescence and spiced sweetness mirror the cake’s flavors while keeping it light and refreshing. Perfect for family gatherings or health-conscious guests. 🍏
Coffee Liqueur Finish
Add a shot of Kahlúa or Tia Maria** to your coffee after dessert for a boozy twist. The coffee’s bitterness balances the cake’s sweetness, while the vanilla in the liqueur ties back to the buttercream. Serve in a small espresso cup for an intimate, after-dinner treat. ☕
Nutrition facts
Frequently asked questions
Why does this recipe use applesauce instead of oil?
The applesauce serves as a natural moisture booster and tenderizer, replacing some of the butter while keeping the cake incredibly moist. It also adds subtle apple flavor without needing extra fat. The combination of applesauce and butter creates a perfect balance of richness and tenderness in each layer.
Can I bake this cake in a different pan size?
Yes, but adjust the baking time accordingly. For 8-inch pans, bake for 20-25 minutes at 350°F, while 5-inch pans may need 30-35 minutes. The key is to bake until a toothpick comes out clean. Just make sure to divide the batter evenly among your chosen pans.
How do I prevent my cake layers from crumbling when stacking?
Let the cakes cool completely before stacking, and ensure they’re level. Use a serrated knife to trim any domed tops. Apply a thin layer of frosting between each layer for stability, and chill the assembled cake for 15 minutes before adding the final frosting coat. This helps everything hold together beautifully.
Can I make this cake gluten-free?
Yes, but use a 1:1 gluten-free flour blend (like Bob’s Red Mill) and add 1 teaspoon xanthan gum to the dry ingredients. The applesauce will still keep it moist, but you may need to reduce baking time slightly since gluten-free cakes can bake faster. Test with a toothpick for doneness.
What’s the best way to store leftover cake?
Wrap tightly in plastic wrap and store at room temperature for up to 3 days. For longer storage, freeze the fully assembled cake (with frosting) for up to 3 months. Thaw overnight in the refrigerator before serving. The frosting can be refrigerated separately for 1 week.

- Taco Bell Breakfast Salsa Recipe: Spicy Cilantro-Lime Kick in Minutes - October 2, 2026
- Authentic Pandi Curry Recipe: Spiced Coconut Milk Magic in One Pot - October 2, 2026
- Macedonian Chicken Recipe: Yogurt-Marinated Crispy Skin and Juicy Centers - October 2, 2026