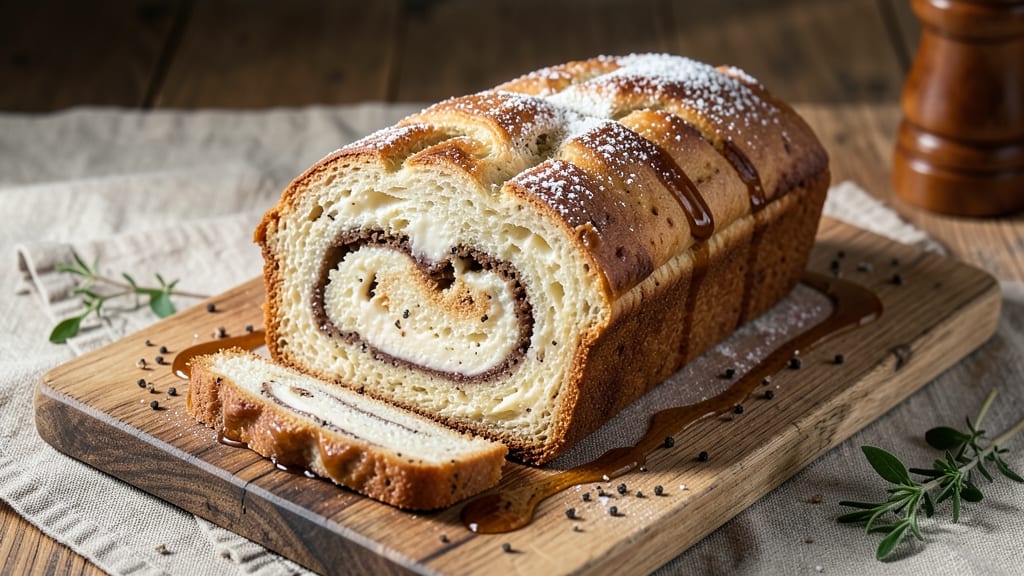
This 7-Eleven cheesecake bread recipe delivers the iconic store-bought experience with homemade perfection—creamy cheesecake swirled into tender, buttery bread in one simple pan. 💛 After years of perfecting the texture (that signature soft-yet-firm crumb), I’ve cracked the code for achieving restaurant-quality results at home without the fuss.
The secret lies in the two-stage baking process: first shaping the bread dough into a loaf, then carefully layering the cheesecake filling before baking. No fancy equipment needed—just a standard loaf pan, a few basic ingredients, and patience for the dough to rise properly.
The filling gets its signature creaminess from full-fat cream cheese and vanilla extract, while the bread’s buttery layers come from a precise blend of flour, sugar, and eggs.
What you’ll end up with is a golden-brown loaf with visible cheesecake swirls throughout—soft enough to slice easily but sturdy enough to hold together. The aroma alone will have your kitchen smelling like a bakery, and each bite delivers that perfect balance of sweet, creamy cheesecake and buttery bread.
This is the kind of dessert that disappears faster than you can say “convenience store hack.”
Perfect for breakfast pastries, dessert parties, or just satisfying that late-night sweet tooth. The recipe scales easily, so you can make one loaf for two or double it for a crowd. Let’s get baking—this one’s a game-changer for homemade treats.
Ingredients for 7 eleven cheesecake bread
Basic pantry staples plus a few specialty touches for that iconic 7-Eleven swirl magic.
| Ingredient | Amount | Notes |
|---|---|---|
| All-Purpose Flour 🌾 | 3 ½ cups | Sifted for light texture |
| Granulated Sugar 🍚 | ½ cup | White or light brown |
| Instant Yeast 🍞 | 2 ½ tsp | Freshly opened package |
| Unsalted Butter 🧈 | ½ cup | Cold, cubed (not melted) |
| Large Eggs 🥚 | 2 whole | Room temperature |
| Milk 🥛 | ¾ cup | Whole milk preferred |
| Vanilla Extract 🍯 | 1 ½ tsp | Pure, not imitation |
| Salt 🧂 | ½ tsp | Diamond Crystal preferred |
| Full-Fat Cream Cheese 🧀 | 8 oz | Room temperature, softened |
| Powdered Sugar 🍚 | ½ cup | For cheesecake filling |
| Heavy Whipping Cream 🥛 | ½ cup | Cold, for swirl effect |
| Lemon Juice 🍋 | 1 tbsp | Freshly squeezed |
| Vanilla Bean Paste 🍯 | ½ tsp | For enhanced flavor |
The flour is non-negotiable here—King Arthur or Gold Medal gives the best rise and crumb. Grab the cream cheese from the refrigerated section, not the tub—it’s richer and melts smoother. For the butter, Land O’Lakes or Plugrá work perfectly, but keep it cold until mixing. The vanilla extract should be pure, not imitation—that’s where the real flavor shines. I always double-check my yeast is fresh by testing it in warm water (should foam in 5-10 minutes).
No vanilla bean paste? Pure vanilla extract plus a pinch of ground vanilla bean works in a pinch. The whipping cream needs to be cold—Trader Joe’s or store-brand heavy cream both work well. Running out of powdered sugar? Granulated sugar processed in a food processor does the trick. For a tangier flavor, add an extra 1/2 tsp lemon zest to the filling. The dough can handle substitutions, but the cheesecake filling is picky—never use low-fat cream cheese or it won’t be creamy.
This loaf keeps beautifully—3-4 days in an airtight container at room temperature, or 1 week in the fridge. For longer storage, slice and freeze portions between parchment paper for up to 3 months. I always bake an extra loaf—it disappears faster than you can say “7-Eleven run.” The filling can be prepped ahead and refrigerated for 24 hours before baking, but don’t let it get too soft.
Why You’ll Love This Recipe
- One-Bowl Wonder: Mixing this up takes about 10 minutes—just flour, sugar, yeast, butter, and eggs. No fancy gadgets, no messy bowls, just dump-and-stir. Honestly, I’ve made it while scrolling through my phone.
- Sweet-Salty Magic: That buttery, slightly tangy crust with a creamy cheesecake swirl? It’s the kind of flavor combo that makes you go back for seconds. The sugar caramelizes just enough to give it a subtle crunch.
- Weeknight Workhorse: Freezes like a dream for busy mornings or last-minute gatherings. Toast a slice straight from the freezer—no reheating needed. Between us, this is my go-to when I need something impressive with zero effort.
- Budget Breakfast: Uses pantry staples you already own, and one loaf feeds my family for days. (Yes, even on a Tuesday night.) Plus, the leftovers stay fresh for five days—no sad, stale bread here.
Step-by-step instructions for 7 Eleven cheesecake bread
Here’s how to create that iconic 7-Eleven cheesecake bread at home—creamy swirls, buttery crust, and all in one pan.
👨🍳 Step 1: Mix the Yeast Dough for Perfect Rise
In a stand mixer fitted with the dough hook attachment, combine the 3.5 cups all-purpose flour, 0.5 cup granulated sugar, 2.5 tsp instant yeast, and 0.5 tsp salt. Mix on low speed for 30 seconds to blend dry ingredients evenly. Here’s the thing—don’t overmix or you’ll develop gluten and lose that tender texture.
Add the 2 whole large eggs (room temperature) and 0.75 cup milk to the bowl. Mix on medium speed for 2-3 minutes until a soft, slightly sticky dough forms. The dough should pull away from the sides of the bowl but still be tacky to the touch. If it’s too dry, add 1 teaspoon milk at a time until it reaches the right consistency.
Transfer the dough to a lightly greased bowl, cover with a damp kitchen towel, and let it rise in a warm place for 1 hour or until doubled in size. I like to place the bowl on top of my turned-off oven with the light on—it creates a perfect warm environment. The dough should be puffy and springy when pressed gently with a finger.
🥘 Step 2: Prepare the Cheesecake Filling
While the dough rises, make the filling by beating the 8 oz full-fat cream cheese (softened) and 0.5 cup unsalted butter (cold, cubed) together in a separate bowl until smooth and creamy. I use a hand mixer for this—it’s easier to control than a stand mixer. Scrape down the sides as needed to ensure even mixing.
Add the 0.5 cup powdered sugar, 1.5 tsp vanilla extract, and 0.5 tsp vanilla bean paste to the cream cheese mixture. Beat again until fully combined and light in color. Here’s where it gets fun—stir in the 1 tbsp lemon juice and 0.5 cup heavy whipping cream (cold) until just incorporated. The mixture should be thick but pipeable.
Transfer the filling to a piping bag fitted with a large star tip. This makes creating those perfect swirls effortless. If you don’t have a piping bag, a heavy-duty plastic bag with a small corner snipped off works just as well. Chill the filled bag in the refrigerator for 10 minutes while you prep the pan.
🔥 Step 3: Shape and Swirl the Dough
Preheat your oven to 350°F and grease a 9×5-inch loaf pan generously with butter. Punch down the risen dough and divide it into two equal portions on a lightly floured surface. Roll each portion into a 12×8-inch rectangle about ¼-inch thick, using a rolling pin.
Place one rectangle in the prepared loaf pan, pressing gently to fit. Pipe the cheesecake filling in a zigzag pattern across the dough, leaving about ½-inch border around the edges. Here’s the key—use a knife to gently swirl the filling into the dough, creating those classic cheesecake patterns. Top with the second dough rectangle and press the edges to seal.
Use a sharp knife to cut a few slits in the top of the bread—this allows steam to escape and prevents a dense crust. Cover the pan loosely with aluminum foil and let the bread rise for 30-45 minutes until the dough puffs up noticeably. The edges should look slightly rounded and the top should have risen about 1 inch above the pan.
🔥 Step 4: Bake to Golden Perfection
Remove the foil and bake for 45-50 minutes until the bread is golden brown on top and a toothpick inserted into the center comes out clean. The bread should smell heavenly—sweet, buttery, and with that unmistakable cheesecake aroma. If the top browns too quickly, tent with foil for the last 10 minutes of baking.
Let the bread cool in the pan for 10 minutes before transferring to a wire rack to cool completely. This resting period is crucial—it allows the filling to set properly and prevents the bread from falling apart when you slice it. Real talk: resist the urge to cut into it immediately. The texture will be much better after full cooling.
🍽️ Step 5: Slice and Serve Warm
Once completely cooled, slice the bread into ½-inch thick pieces using a serrated knife. The layers should be visible and the filling should be creamy and slightly firm. If you prefer a softer texture, you can warm the slices in the oven at 300°F for 5-10 minutes before serving.
Serve warm with a pat of butter or a drizzle of honey for that authentic 7-Eleven experience. The contrast of the warm, buttery bread with the cool, creamy cheesecake filling is what makes this recipe so special. Store any leftovers in an airtight container at room temperature for up to 2 days, or freeze for up to 1 month.
Pro Tips For Making 7 Eleven Cheesecake Bread
- Measure Butter Cold: Take that unsalted butter straight from the fridge—no softening needed. The recipe relies on butter’s fat for that rich, tender crumb, and room-temperature butter just melts into the dough, making the final bread dense and greasy. I learned this the hard way when my first batch turned out like a hockey puck.
- Dissolve Yeast Properly: Mix the instant yeast with warm water (110°F) and a pinch of sugar first—let it foam for 5 minutes before adding to the wet ingredients. Skipping this step means the yeast might not activate fully, leading to a flat, sad loaf. (Yes, even if you’re impatient like me.)
- Don’t Overmix the Dough: Once the flour hits the wet ingredients, stop stirring after 30 seconds—just until combined. Overmixing develops gluten, and this dough is delicate. I used to think more mixing = better texture, but now I know it’s the enemy of that soft, chewy interior.
- Proof at Room Temp: Let the dough rise in a warm spot (like the oven with the light on) until it’s almost doubled—about 1.5 to 2 hours. Cold proofing slows things down, and skipping this step means your bread won’t have that light, airy lift. (Your future self will thank you.)
Best sauces and condiments for this 7 eleven cheesecake bread
Classic Caramel Drizzle
Elevate your cheesecake bread with a rich caramel drizzle made from ½ cup granulated sugar, ¼ cup unsalted butter, and ¼ cup heavy cream. Cook the sugar and butter in a saucepan over medium heat until melted and amber-colored, then whisk in the cream.
Let it cool slightly before drizzling over warm slices. The sweet, buttery caramel complements the tangy cheesecake perfectly. 💛
Lemon Glaze Finish
Brighten the flavors with a zesty lemon glaze using ½ cup powdered sugar, 1 tbsp fresh lemon juice, and 1 tsp lemon zest. Mix until smooth and drizzle over cooled slices.
The acidity cuts through the richness, balancing the sweetness. For extra flair, add a pinch of salt to enhance the flavors.
Chocolate Ganache Swirl
Add a decadent twist by piping a dark chocolate ganache between the dough layers before baking. Melt ½ cup dark chocolate chips and ¼ cup heavy cream together, then chill until thickened.
Pipe it alongside the cheesecake filling for a layered effect. The ganache adds depth and pairs beautifully with the vanilla notes.
Maple Cream Cheese Spread
For a breakfast-friendly option, mix 4 oz softened cream cheese, 2 tbsp maple syrup, and a pinch of salt into a spreadable consistency. Spread a thin layer on warm slices before serving. The maple adds a subtle earthiness that complements the sweetness without overpowering it.
Salted Caramel Butter
Combine ¼ cup softened butter, 2 tbsp caramel sauce, and a pinch of flaky sea salt for a gourmet touch. Spread a small amount on top of each slice before serving. The salt enhances the caramel’s sweetness, creating a sophisticated finish that feels restaurant-worthy.
Strawberry Jam Swirl
For a fruity variation, replace the cheesecake filling with a mix of ½ cup strawberry jam and 2 tbsp cream cheese. Swirl it into the dough layers before baking.
The jam adds a tangy, jammy flavor that contrasts beautifully with the buttery bread. Serve warm with a dusting of powdered sugar for extra charm. 🍓
Nutrition facts
Frequently asked questions
Can I make this recipe without a stand mixer?
The dough can absolutely be mixed by hand! Use a large mixing bowl and a wooden spoon to combine the dry ingredients first, then gradually add the wet ingredients (eggs and milk) while stirring vigorously. Mix until a soft dough forms—about 5-7 minutes of vigorous stirring should do it. For the cheesecake filling, use a hand mixer or even a sturdy whisk to beat the cream cheese and butter until smooth.
Why did my cheesecake bread turn out dense instead of fluffy?
Dense bread usually happens from overmixing the dough or skipping the proper rise time. Make sure to mix the dough just until combined (about 2-3 minutes with a mixer) and let it rise until doubled in size—at least 1 hour. Also, check that your yeast is fresh (it should foam when mixed with warm water). If the oven was too hot or the bread baked too long, the moisture evaporates too quickly, making it dense.
How do I store leftovers to keep them fresh?
Wrap the loaf tightly in plastic wrap or place it in an airtight container at room temperature for up to 3 days. For longer storage, slice the bread and freeze the pieces between parchment paper for up to 1 month. To reheat, warm slices in a 300°F oven for 5-10 minutes until the cheesecake filling is creamy again. The bread texture stays best when stored properly!
Can I use a different type of cream cheese for the filling?
Stick with full-fat cream cheese for the best texture—it melts smoothly and stays creamy. Low-fat or whipped varieties won’t give the same rich, dense filling. If you’re out of full-fat, you can mix half full-fat and half low-fat, but the result will be slightly lighter. For a tangier flavor, try adding a pinch of lemon zest to the filling while mixing.
What’s the best way to slice this bread for clean cuts?
Let the bread cool completely before slicing to prevent crumbling. Use a serrated knife and dip it in hot water between each cut to keep the layers clean. For extra precision, score the top lightly with a sharp knife before baking—this guides where to slice later. Warm slices (not hot) are easiest to cut neatly, but cooled bread holds its shape better for serving.

- Teriyaki Dry Rub Recipe: Umami-Packed Flavor Without the Mess - November 9, 2026
- Calamari in Tomato Sauce Recipe: Crispy Squid with Bright, Acid-Balanced Flavors - November 9, 2026
- Restaurant Style Home Fries Recipe: Crispy Potato Wedges With Herb-Infused Oil - November 9, 2026